Thermador HDDW36FS Installation Instructions - Page 10
devices must - reviews
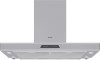 |
View all Thermador HDDW36FS manuals
Add to My Manuals
Save this manual to your list of manuals |
Page 10 highlights
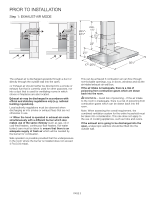
Step 5: INSTALLATION 07. Remove the hood. Drill the 4 lower 1/4" ø fixing holes and press in the wall plugs flush with the wall. Step 5: INSTALLATION 13. Insert the complete duct cover at an angle and swivel to the rear. 3. 1. 2. 08. Attach the hood and screw into position with the remaining 4 screws. 14. Carefully pull the upper duct cover upwards and screw the sides to the mounting bracket with 2 screws. 09. Connect up the outlet ducting. 10. Connect the hood to the electrical supply. 11. Carefully remove the protective foil. IMPORTANT: Avoid damage to the sensitive surface. 12. Insert the upper duct cover (slots downwards) into the lower duct cover. IMPORTANT: Protect the cover panels from scratches, for example by laying the template used for marking the wall over the top edge of the lower section. 15. Unscrew the transportation protection devices on the left and right. The transportation protection devices must be handed to the customer for safe-keeping. ṇ CAUTION - After removing the transportation protection devices, follow the safety instructions and the cleaning and care instructions regarding the dangers of being crushed. 16. Insert the grease filter (refer to Operating Instructions). If the vent system does not operate satisfactorily during any of the above procedures, review all steps in these Installation Instructions to ensure that nothing has been omitted or overlooked. Also, refer to the Care & Use Manual for additional information or call Thermador Customer Support 1-800-735-4328. PAGE 8
-
 1
1 -
2
-
3
-
4
-
 5
5 -
 6
6 -
 7
7 -
 8
8 -
 9
9 -
 10
10 -
 11
11 -
 12
12 -
 13
13 -
 14
14 -
 15
15 -
16
-
17
-
18
-
19
-
20
-
21
-
22
-
23
-
24
-
25
-
26
-
27
-
28
-
29
-
30
-
31
-
32
 |
 |
