Thermador HDDW36FS Installation Instructions - Page 6
For optimum hood efficiency, CONNECTING A, EXHAUST-AIR DUCT, Step 2: PREPARING THE WALL
 |
View all Thermador HDDW36FS manuals
Add to My Manuals
Save this manual to your list of manuals |
Page 6 highlights
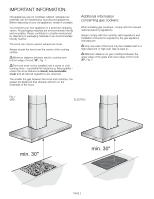
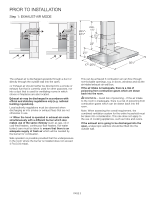
PRIOR TO INSTALLATION For optimum hood efficiency: ❑ Short, smooth duct pipe. ❑ As few bends in the ducting as possible. ❑ Diameter of ducting to be as large as possible and no tight bends in ducting. If long, rough exhaust-air ducting, many ducting bends or smaller pipe diameters are used, the air extraction rate will no longer be at an optimum level and there will be an increase in noise. IMPORTANT: The manufacturer of the hood accepts no liability for complaints which can be attributed to the design and layout of the ductwork. ❑ Round pipes: We recommend Internal diameter: 6". ❑ Flat ducts must have an internal cross-section that equates to that of round pipes. There should be no sharp bends. l 6" approx. 28.3 inches2 ❑ If pipes have different diameters: Insert sealing strip. ❑ For exhaust-air mode, ensure that there is an adequate supply of fresh air. CONNECTING A l 6" EXHAUST-AIR DUCT: ❑ Mount the duct directly onto the air outlet on the hood. PRIOR TO INSTALLATION Step 2: PREPARING THE WALL ❑ The wall must be flat and perpendicular. ❑ Ensure that the wall is capable of providing a firm hold for mounting screws and plugs. Weight in kg: 23.4 PAGE 4
-
 1
1 -
 2
2 -
 3
3 -
 4
4 -
 5
5 -
 6
6 -
 7
7 -
 8
8 -
 9
9 -
 10
10 -
 11
11 -
 12
12 -
13
-
14
-
15
-
16
-
17
-
18
-
19
-
20
-
21
-
22
-
23
-
24
-
25
-
26
-
27
-
28
-
29
-
30
-
31
-
32
 |
 |
