Thermador MED301WS Installation instructions - Page 7
Checklist for Installation, Removing Packaging
 |
View all Thermador MED301WS manuals
Add to My Manuals
Save this manual to your list of manuals |
Page 7 highlights
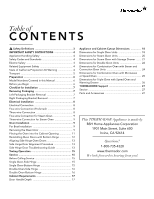
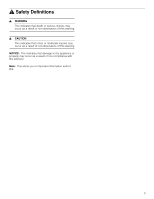
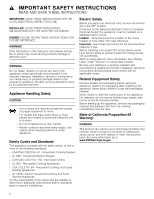
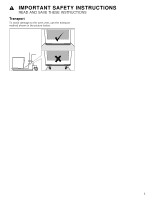
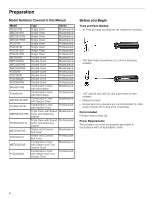
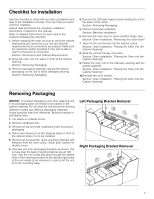
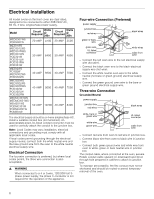
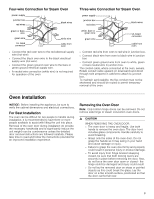
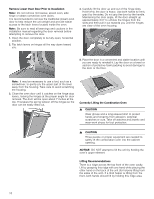
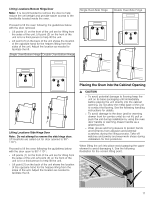
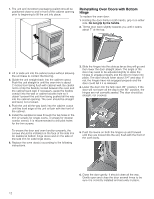
Checklist for Installation Use this checklist to verify that you have completed each step of the installation process. This can help you avoid common mistakes. Always read and follow the complete installation instructions contained in this manual. Refer to detailed instructions for each step in the sections following this checklist. 1. Before installing the oven, be sure to verify the cabinet dimensions are correct for your unit and that the required electrical connections are present. Make sure the electrical conduit provided on the unit is able to reach to the point of connection. Section: Dimensions and Cabinet Requirements 2. Move the oven unit into place in front of the cabinet opening. Section: Removing Packaging 3. Remove packaging materials, leaving the bottom packaging on the unit to avoid damaging flooring. Section: Removing Packaging 4. Remove the T20 (star head) screws holding the unit to the base of the carton. Section: Removing Packaging 5. Perform Electrical Installation. Section: Electrical Installation 6. Remove the oven door or doors (bottom hinge only). Section: Oven Installation, "Removing the Oven Door" 7. Team lift the unit directly into the cabinet cutout. Section: Oven Installation, "Placing the Oven into the Cabinet Opening" 8. Slide the unit all the way into place. Section: Oven Installation, "Placing the Oven into the Cabinet Opening" 9. Fasten the oven unit to the cabinetry opening with the screws supplied. Section: Oven Installation, "Placing the Oven into the Cabinet Opening" 10.Reinstall the oven door(s). Section: Oven Installation, "Placing the Oven into the Cabinet Opening" Removing Packaging NOTICE: To prevent damage to your floor keep the unit in its packaging base until ready to be placed in the cabinet opening. Do not slide the unit across the flooring. Different models use different packaging materials. Actual brackets may look differently. Bracket remains in packaging base. 1. Cut straps on outside of box. 2. Remove cardboard box. 3. Remove all top and side cardboard, foam and wood packaging. 4. Place oven (leaving it on the shipping base) in front of the cabinet where it is to be installed. 5. Remove all accessories, racks, packing materials and literature from the oven cavity. Check both cavities for double ovens. 6. Unscrew unit from packaging brackets as shown. The screws near the base mounting bracket are all T20 size. Only the one screw that goes through the slotted hole in the mounting bracket on the left and right sides of the unit needs to be removed in order to lift the unit from the mounting base. Left Packaging Bracket Removal Right Packaging Bracket Removal 7
-
 1
1 -
 2
2 -
 3
3 -
 4
4 -
 5
5 -
 6
6 -
 7
7 -
 8
8 -
 9
9 -
 10
10 -
 11
11 -
 12
12 -
13
-
14
-
15
-
16
-
17
-
18
-
19
-
20
-
21
-
22
-
23
-
24
-
25
-
26
-
27
-
28
-
29
-
30
-
31
-
32
-
33
-
34
-
35
-
36
-
37
-
38
-
39
-
40
-
41
-
42
-
43
-
44
-
45
-
46
-
47
-
48
-
49
-
50
-
51
-
52
-
53
-
54
-
55
-
56
-
57
-
58
-
59
-
60
-
61
-
62
-
63
-
64
-
65
-
66
-
67
-
68
-
69
-
70
-
71
-
72
-
73
-
74
-
75
-
76
-
77
-
78
-
79
-
80
-
81
-
82
-
83
-
84
 |
 |