Thermador PCG486GD Installation Instructions PART3 - Page 16
Installer Checklist - thermadore
 |
View all Thermador PCG486GD manuals
Add to My Manuals
Save this manual to your list of manuals |
Page 16 highlights
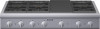
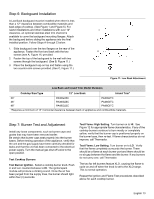
Installer Checklist Yellow Flames: Further adjustment is required. Yellow Tips on Outer Cones: Normal for LP Gas. Soft Blue Flames: Normal for Natural Gas. If the flame is completely or mostly yellow, verify that the regulator is set for the correct fuel. After adjustment, retest. Some orange-colored streaking is normal during the initial start-up. Allow unit to operate 4-5 minutes and re-evaluate before making adjustments. Figure 12: Flame Characteristics WHEN FLAME IS PROPERLY ADJUSTED: • There should be a flame at each burner port. • There should be no air gap between the flame and burner port. Call Thermador if: 1. Any of the burners do not light. 2. Any of the burners continue to burn yellow. Final Check List • Cooktop correctly positioned in countertop recess. • Specified clearances maintained to cabinet surfaces. • Burner caps positioned properly on burner bases. • All packaging material removed. • Island Trim or Backguard attached according to instructions. • The griddle plate tilted slightly forward. (See "Griddle Tilt Adjustment (not all models)" on page 10.) Gas Supply • Connection: 1/2" NPT with a minimum 3/4" diameter flex line. • If converting from natural to LP gas, refer to LP Conversion Instructions for details. • Manual gas shut off valve installed in an accessible location (without requiring removal of appliance). • Unit tested and free of gas leaks. Electrical • For models with the electric griddle, a polarized and grounded 120VAC receptacle with 15 AMP over current protection is provided for service cord connection. Operation • All internal packing materials removed. (Check below grates and grill pans.) • Bezels centered on burner knobs, and knobs turn freely. • Purge air from gas system by operating one of the top burners for several minutes. • Each burner lights satisfactorily, both individually and with other burners operating. • Burner grates are correctly positioned. Installer • Give CARE and USE MANUAL and INSTALLATION INSTRUCTIONS to your customer. English 14
-
 1
1 -
2
-
3
-
4
-
5
-
6
-
7
-
8
-
9
-
10
-
 11
11 -
 12
12 -
 13
13 -
 14
14 -
 15
15 -
 16
16 -
 17
17 -
 18
18 -
 19
19 -
 20
20 -
 21
21 -
22
-
23
-
24
-
25
-
26
-
27
-
28
-
29
-
30
-
31
-
32
-
33
-
34
-
35
-
36
-
37
-
38
-
39
-
40
-
41
-
42
-
43
-
44
-
45
-
46
-
47
-
48
-
49
-
50
-
51
-
52
-
53
-
54
-
55
-
56
 |
 |
