Toro 20332 Operation Manual - Page 5
Setup - engine
 |
UPC - 021038203324
View all Toro 20332 manuals
Add to My Manuals
Save this manual to your list of manuals |
Page 5 highlights
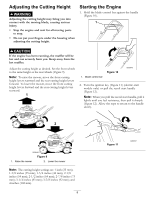
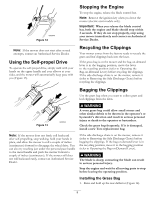
Setup Important: Remove and discard the protective plastic sheet that covers the engine. 1 Installing the Handle No Parts Required Procedure WARNING Folding or unfolding the handle improperly can damage the cables, causing an unsafe operating condition. • Do not damage the cables when folding or unfolding the handle. • If a cable is damaged, contact an Authorized Service Dealer. 1. Remove the handle knobs from the mower housing (Figure 3). Important: Route the cables to the outside of the handle knobs as you install the handle. 2 Filling the Engine with Oil No Parts Required Procedure Important: Your mower does not come with oil in the engine, but it does come with a bottle of oil. Before starting the engine, fill the engine with oil. Max. fill: 20 oz. (0.59 l), type: SAE 30 detergent oil with an API service classification of SF, SG, SH, SJ, SL, or higher. Note: When the crankcase is empty, pour about 3/4 of the crankcase capacity of oil in the crankcase, then do the following: 1. Move the mower to a level surface. 2. Remove the dipstick by rotating the cap counterclockwise and pulling it out (Figure 4). Figure 3 2. Move the handle to the operating position. 3. Install and tighten the handle knobs that you removed in step 1 . 1. Dipstick Figure 4 3. Wipe the dipstick clean with a clean cloth. 4. Insert the dipstick fully into the oil fill tube, then remove the dipstick. 5. Read the oil level on the dipstick. Note: If the oil level is below the Add mark on the dipstick, slowly pour a small amount of oil into the oil fill tube, wait 3 minutes, and repeat steps 3 through 5 until the oil level is at the Full mark on the dipstick (Figure 4). 5
-
 1
1 -
 2
2 -
 3
3 -
 4
4 -
 5
5 -
 6
6 -
 7
7 -
 8
8 -
 9
9 -
 10
10 -
 11
11 -
12
-
13
-
14
-
15
-
16
-
17
-
18
-
19
-
20
 |
 |
