Toshiba 19CV100U User Manual - Page 22
Connecting a digital audio, system
 |
View all Toshiba 19CV100U manuals
Add to My Manuals
Save this manual to your list of manuals |
Page 22 highlights
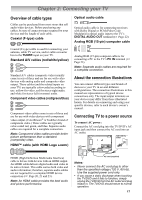
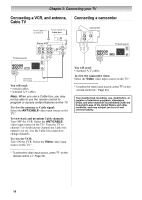
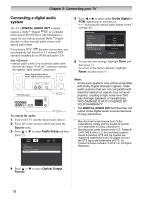
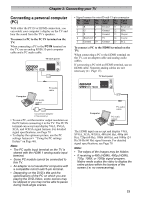
Chapter 2: Connecting your TV Connecting a digital audio system The TV's DIGITAL AUDIO OUT terminal outputs a Dolby®* Digital or 2-channel down-mixed PCM (Pulse-Code Modulation) signal for use with an external Dolby® Digital decoder or other external audio system with optical audio input. If you have a DTS* decoder or processor, you can obtain the full benefit of 5.1 channel DTS encoded soundtracks on DVDs and audio CDs. You will need: • optical audio cable (Use an optical audio cable that has the larger "TosLink" connector and not the smaller "mini-optical" connector.) 5 Press or to select either Dolby Digital or PCM, depending on your device. ( "Selecting the optical audio output format" on Page 41). 6 To save the new settings, highlight Done and then press . To revert to the factory defaults, highlight Reset and then press . To control the audio: 1 Turn on the TV and the digital audio device. 2 Press on the remote control and open the Sound menu. 3 Press or to select Audio Setup and then press . Note: • Some audio systems may not be compatible with Dolby Digital bitstream signals. Older audio systems that are not compatible with standard optical out signals may not work properly, creating a high noise level that may damage speakers or headphones. THIS DAMAGE IS NOT COVERED BY YOUR WARRANTY. • The DIGITAL AUDIO OUT terminal may not output some digital audio sources because of copy restrictions. * Manufactured under license from Dolby Laboratories. Dolby and the double-D symbol are trademarks of Dolby Laboratories. ** Manufactured under license under U.S. Patent #: 5,451,942 & other U.S. and worldwide patents issued & pending. DTS and the Symbol are registered trademarks and DTS Digital Out and the DTS logos are trademarks of DTS, Inc. Product includes software. © DTS, Inc. All Rights Reserved. 4 Press or to select Optical Output Format. 22
-
 1
1 -
2
-
3
-
4
-
5
-
6
-
7
-
8
-
9
-
10
-
11
-
12
-
13
-
14
-
15
-
16
-
 17
17 -
 18
18 -
 19
19 -
 20
20 -
 21
21 -
 22
22 -
 23
23 -
 24
24 -
 25
25 -
 26
26 -
 27
27 -
28
-
29
-
30
-
31
-
32
-
33
-
34
-
35
-
36
-
37
-
38
-
39
-
40
-
41
-
42
-
43
-
44
-
45
-
46
-
47
-
48
-
49
-
50
-
51
-
52
-
53
-
54
-
55
-
56
-
57
-
58
-
59
-
60
-
61
-
62
-
63
-
64
-
65
-
66
-
67
-
68
-
69
-
70
-
71
-
72
-
73
-
74
-
75
-
76
-
77
-
78
-
79
-
80
-
81
-
82
-
83
-
84
-
85
-
86
-
87
-
88
 |
 |