Toshiba 42HL67 Owner's Manual - English - Page 10
TV front and side panel controls and connections - remote
 |
UPC - 022265000458
View all Toshiba 42HL67 manuals
Add to My Manuals
Save this manual to your list of manuals |
Page 10 highlights
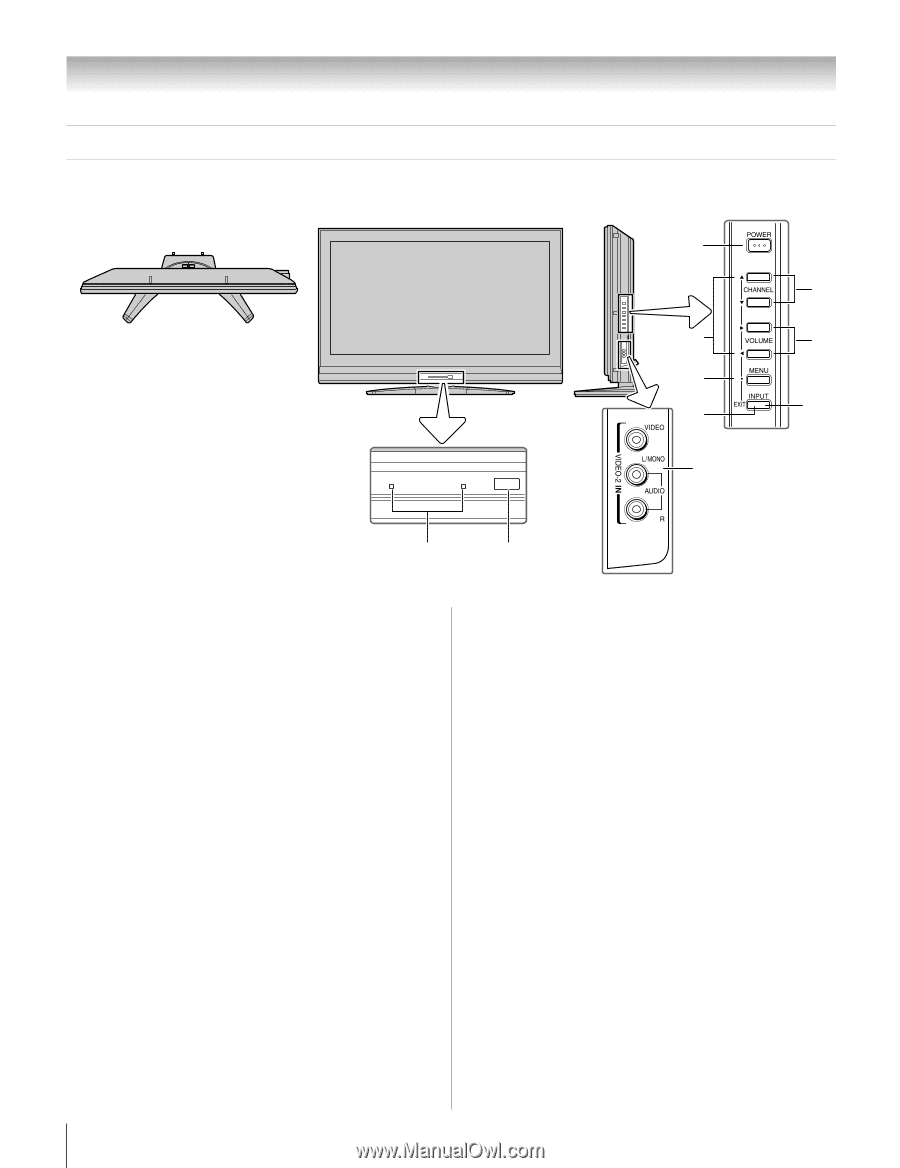
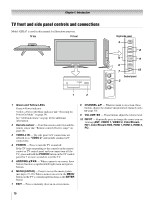
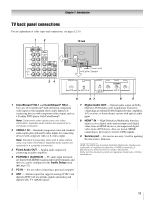
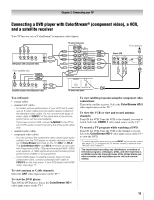
Chapter 1: Introduction TV front and side panel controls and connections Model 42HL67 is used in this manual for illustration purposes. TV top TV front POWER Right side panel 4 8 5 9 6 7 10 Control panel 3 1 2 1 Green and Yellow LEDs Green = Power indicator Yellow = Power-On Mode indicator (- "Selecting the Power-On Mode" on page 34) See "LED indications" on page 60 for additional information. 2 Remote sensor - Point the remote control toward this remote sensor (- "Remote control effective range" on page 20). 3 VIDEO-2 IN - The side panel A/V connections are referred to as "VIDEO 2" and include standard A/V connections. 4 POWER - Press to turn the TV on and off. If the TV stops responding to the controls on the remote control or TV control panel and you cannot turn off the TV, press and hold the POWER button on the TV control panel for 5 or more seconds to reset the TV. 5 ARROWS BbC c - When a menu is on-screen, these buttons function as up/down/left/right menu navigation buttons. 6 MENU (ENTER) - Press to access the menu system (- pages 27-28). When a menu is on-screen, the MENU button on the TV's control panel functions as the ENTER button. 7 EXIT - Press to instantly close an on-screen menu. 8 CHANNEL Bb - When no menu is on-screen, these buttons change the channel (programmed channels only; - page 30). 9 VOLUME C c - These buttons adjust the volume level. 10 INPUT - Repeatedly press to change the source you are viewing (ANT, VIDEO 1, VIDEO 2, ColorStream HD1, ColorStream HD2, HDMI 1, HDMI 2, HDMI 3, PC). 10
-
 1
1 -
2
-
3
-
4
-
 5
5 -
 6
6 -
 7
7 -
 8
8 -
 9
9 -
 10
10 -
 11
11 -
 12
12 -
 13
13 -
 14
14 -
 15
15 -
16
-
17
-
18
-
19
-
20
-
21
-
22
-
23
-
24
-
25
-
26
-
27
-
28
-
29
-
30
-
31
-
32
-
33
-
34
-
35
-
36
-
37
-
38
-
39
-
40
-
41
-
42
-
43
-
44
-
45
-
46
-
47
-
48
-
49
-
50
-
51
-
52
-
53
-
54
-
55
-
56
-
57
-
58
-
59
-
60
-
61
-
62
-
63
-
64
-
65
-
66
 |
 |