Toshiba BDX3300KU User Guide - Page 32
Using a USB flash drive, Customizing the function settings, Performing Easy Setup, General operations
 |
View all Toshiba BDX3300KU manuals
Add to My Manuals
Save this manual to your list of manuals |
Page 32 highlights
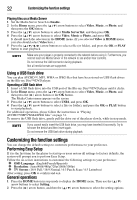
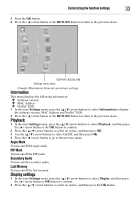
32 Customizing the function settings Playing files on a Media Server 1 Set the Media Server Search to Enable. 2 In the Home menu, press the ( / ) arrow buttons to select Video, Music, or Photo, and then press the OK button. 3 Press the ( / ) arrow buttons to select Media Server list, and then press OK. 4 Press the ( / ) arrow buttons to select Video, Music or Photo, and press OK. It should match the selection in the HOME menu. (If you selected Video in HOME menu, you also should select Video here.) 5 Press the ( / / / ) arrow buttons to select a file (or folder), and press the OK or PLAY button to start playback. Make sure your player is properly connected to the network before using it. Furthermore, you need at least one Media Server in the network to see and/or hear contents. Do not remove the LAN connector during playback. Not all media formats are supported. Using a USB flash drive You can play AVCHD™, MP3, WMA or JPEG files that have been stored on USB flash drives on the Blu-ray Disc™/DVD player. Operating a USB flash drive 1 Insert a USB flash drive into the USB port of the Blu-ray Disc™/DVD player until it clicks. 2 In the Home menu, press the ( / ) arrow buttons to select Video, Music, or Photo, and then press the ( ) arrow button or the OK button. The Media Center menu appears on the screen 3 Press the ( / ) arrow buttons to select USB1, and press OK. 4 Press the ( / ) arrow buttons to select a file (or folder), and press the OK or PLAY button to start playback. For additional operations, please follow the instructions in "Playing AVCHD™/MP3/WMA/JPEG files" on page 31. To remove the USB flash drive, gently pull the drive out of the player slowly, while in stop mode. If you cannot easily insert the USB flash drive, you may have inserted it incorrectly. Try to turnover the device and then insert again. Do not remove the USB flash drive during playback. Customizing the function settings You can change the default settings to customize performance to your preference. Performing Easy Setup If it is the first time for the player to start up or users restore all settings to factory defaults, the system will prompt you to perform Easy Setup. Follow the on-screen instructions to customize the following settings to your preference: ❖ OSD Language: (English/French/Spanish) ❖ Resolution: (Auto/480i/480p/720p/1080i/1080p) ❖ TV Screen: (16:9 Full / 16:9 Normal / 4:3 Pan & Scan / 4:3 Letterbox) After setting, press OK to confirm and exit. General operations 1 Press the HOME button in stop mode to display the HOME menu. Then use the ( / ) arrow buttons to select Setting. 2 Press the ( ) arrow button, and then the ( / ) arrow buttons to select the setting options.
-
 1
1 -
2
-
3
-
4
-
5
-
6
-
7
-
8
-
9
-
10
-
11
-
12
-
13
-
14
-
15
-
16
-
17
-
18
-
19
-
20
-
21
-
22
-
23
-
24
-
25
-
26
-
 27
27 -
 28
28 -
 29
29 -
 30
30 -
 31
31 -
 32
32 -
 33
33 -
 34
34 -
 35
35 -
 36
36 -
 37
37 -
38
-
39
-
40
-
41
-
42
-
43
-
44
-
45
-
46
-
47
-
48
-
49
-
50
-
51
-
52
-
53
-
54
-
55
-
56
 |
 |