Toshiba D-R1 Owners Manual - Page 109
Play the connected DV format digital video
 |
View all Toshiba D-R1 manuals
Add to My Manuals
Save this manual to your list of manuals |
Page 109 highlights
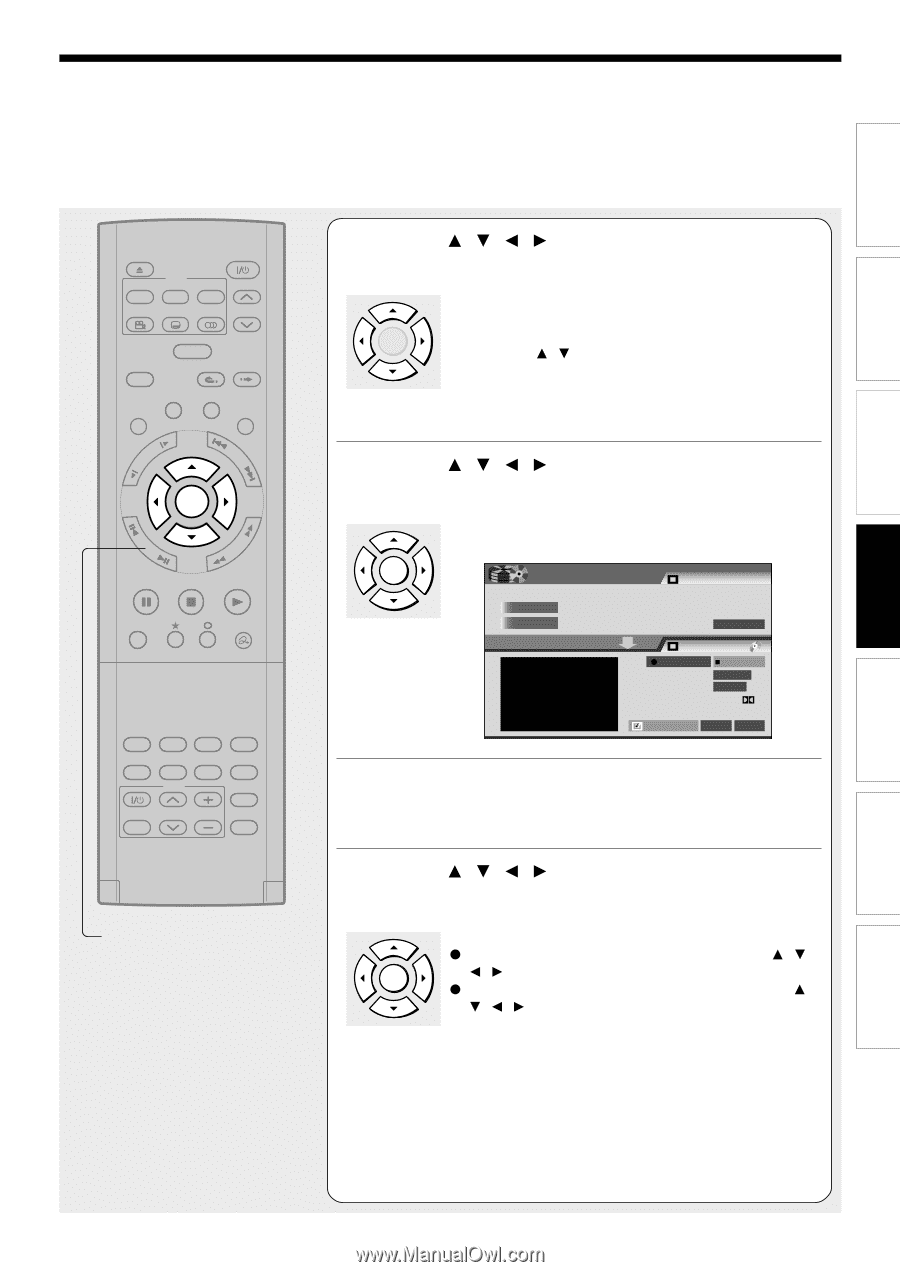
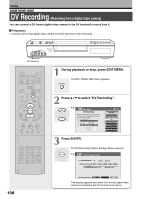
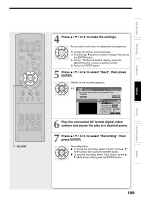
Introduction Recording Playback Editing IP FRAME OPEN/CLOSE DVD TOP MENU MENU RETURN ANGLE SUBTITLE AUDIO CHANNEL V-REMOTE TIMESLIP INSTANT REPLAY INSTANT SKIP REC MENU EDIT MENU LIBRARY CONTENT MENU OW SK SL SEARCH ENTER /ADJUST PAUSE STOP PICTURE PLAY REC QUICK MENU REMAIN DISPLAY TIME BAR CHP DIVIDE DIMMER FL SELECT ZOOM P in P TV PROGRESSIVE TV/VIDEO CHANNEL VOLUME INPUT SELECT ADJUST 4 Press / / / to make the settings. As you select each item, its explanation accompanies. ENTER To change the picture and sound rates: 1) Press the / buttons to select "Change" then press the ENTER button. 2) On the "AV Record Quality" display, press the ADJUST button to select a setting number. 3) Press the ENTER button. 5 Press / / / to select "Next", then press ENTER. Details on the recording appears. ENTER e.g. EDIT MENU DV Recording Equipment with DV Terminal "Play" and then "Pause" with the connected equipment to DV. Manufacturer Equipment Playback Time 00 : 02 : 09 : 16F Recording Media : DVD Rec Rec Recording Time Remaing Space AV Record Quality DV Chapter Create Stop(Save) 00 : 00 : 11 071 : 49 SP4.6 D/M 1 Off Full Display End Return A B 6 Play the connected DV format digital video camera and pause the play at a desired scene. 7 Press / / / to select "Recording", then press ENTER. Recording starts. To pause the recording, select "Pause" by the / / / buttons then press the ENTER button. ENTER To stop the recording, select "Stop (Save)" by the / / / buttons then press the ENTER button. Library Function setup Others 109
-
 1
1 -
2
-
3
-
4
-
5
-
6
-
7
-
8
-
9
-
10
-
11
-
12
-
13
-
14
-
15
-
16
-
17
-
18
-
19
-
20
-
21
-
22
-
23
-
24
-
25
-
26
-
27
-
28
-
29
-
30
-
31
-
32
-
33
-
34
-
35
-
36
-
37
-
38
-
39
-
40
-
41
-
42
-
43
-
44
-
45
-
46
-
47
-
48
-
49
-
50
-
51
-
52
-
53
-
54
-
55
-
56
-
57
-
58
-
59
-
60
-
61
-
62
-
63
-
64
-
65
-
66
-
67
-
68
-
69
-
70
-
71
-
72
-
73
-
74
-
75
-
76
-
77
-
78
-
79
-
80
-
81
-
82
-
83
-
84
-
85
-
86
-
87
-
88
-
89
-
90
-
91
-
92
-
93
-
94
-
95
-
96
-
97
-
98
-
99
-
100
-
101
-
102
-
103
-
 104
104 -
 105
105 -
 106
106 -
 107
107 -
 108
108 -
 109
109 -
 110
110 -
 111
111 -
 112
112 -
 113
113 -
 114
114 -
115
-
116
-
117
-
118
-
119
-
120
-
121
-
122
-
123
-
124
-
125
-
126
-
127
-
128
-
129
-
130
-
131
-
132
-
133
-
134
-
135
-
136
-
137
-
138
-
139
-
140
-
141
-
142
-
143
-
144
 |
 |