Toshiba D-R560 Owner's Manual - English - Page 39
Toshiba D-R560 - DVD Recorder With TV Tuner Manual
 |
UPC - 022265001363
View all Toshiba D-R560 manuals
Add to My Manuals
Save this manual to your list of manuals |
Page 39 highlights
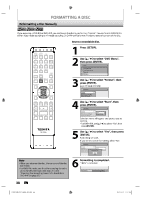
SETTING A DISC TO PROTECT Introduction To prevent accidental recording, editing or erasing the titles, you can protect them from "DVD Menu" menu. OPEN/ CLOSE INPUT SELECT HDMI .@/: ABC DEF GHI JKL MNO CH PQRS TUV WXYZ 1 2 3 4 Press [SETUP]. Use [K / L] to select "DVD Menu", then press [ENTER]. Use [K / L] to select "Disc Protect OFF ON", then press [ENTER]. e.g.) VR mode DVD-RW DVD Menu Format Finalize Disc Protect OFF ON Delete All Playlists Connections Basic Setup SPACE TIMER PROG. DTV/TV SETUP DISPLAY AUDIO TOP MENU MENU/LIST Disc Management ENTER CLEAR RETURN Use [K / L] to select "Yes", then press [ENTER]. DVD Menu Format Finalize Disc Protect OFF ON Protect this disc? Delete All Playlist Yes No SKIP REV FWD SKIP Recording PAUSE PLAY STOP TIME SLIP 1.3x / 0.8x PLAY INSTANT SKIP REPEAT REC MODE REC ZOOM A disc will be protected. This operation may take awhile to be completed. SE-R0264 Playback Editing Note To cancel the disc protect: • When you insert a disc protected with this unit, "Disc Protect ON OFF" will appear instead of "OFF ON". DVD Menu Format Finalize Disc Protect ON OFF Delete All Playlists Function Setup Others To release the protection for the disc, select "Disc Protect ON OFF" at step 3, then follow rest of the procedures. EN E7M70UD_D-R560KU_EN.indd 39 39 2007/12/17 11:11:55
-
 1
1 -
2
-
3
-
4
-
5
-
6
-
7
-
8
-
9
-
10
-
11
-
12
-
13
-
14
-
15
-
16
-
17
-
18
-
19
-
20
-
21
-
22
-
23
-
24
-
25
-
26
-
27
-
28
-
29
-
30
-
31
-
32
-
33
-
 34
34 -
 35
35 -
 36
36 -
 37
37 -
 38
38 -
 39
39 -
 40
40 -
 41
41 -
 42
42 -
 43
43 -
 44
44 -
45
-
46
-
47
-
48
-
49
-
50
-
51
-
52
-
53
-
54
-
55
-
56
-
57
-
58
-
59
-
60
-
61
-
62
-
63
-
64
-
65
-
66
-
67
-
68
-
69
-
70
-
71
-
72
-
73
-
74
-
75
-
76
-
77
-
78
-
79
-
80
-
81
-
82
-
83
-
84
-
85
-
86
-
87
-
88
-
89
-
90
-
91
-
92
-
93
-
94
-
95
-
96
-
97
-
98
-
99
-
100
-
101
-
102
-
103
-
104
-
105
-
106
-
107
-
108
-
109
-
110
-
111
-
112
-
113
-
114
-
115
-
116
-
117
 |
 |
