Toshiba D-R560 Owner's Manual - English - Page 46
Toshiba D-R560 - DVD Recorder With TV Tuner Manual
 |
UPC - 022265001363
View all Toshiba D-R560 manuals
Add to My Manuals
Save this manual to your list of manuals |
Page 46 highlights
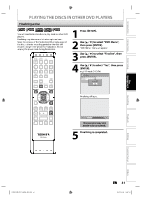
BASIC RECORDING & ONE-TOUCH TIMER RECORDING Follow the steps to record TV programs. OPEN/ CLOSE INPUT SELECT HDMI .@/: ABC DEF 1 2 3 4 5 Press [I/y ON/STANDBY]. y Turn on the TV and be sure to select the input to which the unit is connected. Press [OPEN/CLOSE A] to open the disc tray and insert your disc with its label facing up. GHI JKL MNO CH PQRS TUV WXYZ SPACE TIMER PROG. Align the disc to the disc tray guide. DTV/TV SETUP DISPLAY AUDIO TOP MENU MENU/LIST Press [OPEN/CLOSE A] to close the disc tray. It may take awhile to load the disc completely. • When inserting a brand-new DVD-RW or DVD+RW, the unit automatically starts to format. • If titles have been recorded on the disc, the title list is displayed. Press [STOP C] to exit the title list. ENTER CLEAR RETURN SKIP REV FWD SKIP PAUSE PLAY STOP TIME SLIP 1.3x / 0.8x PLAY INSTANT SKIP REPEAT REC MODE REC ZOOM Press [REC MODE] to select a recording mode. Refer to "Recording Mode" on page 43. SE-R0264 SP 1:53 Press [DTV/TV] to select analog TV or digital TV, then use [CH / ] or [the Number buttons] and [-] (for digital TV channels) to select a desired channel to record. Refer to "Switching Analog Mode/Digital Mode" and "Channel Selection"on page 31. CH 12 46 EN 2007/12/17 11:12:04 E7M70UD_D-R560KU_EN.indd 46
-
 1
1 -
2
-
3
-
4
-
5
-
6
-
7
-
8
-
9
-
10
-
11
-
12
-
13
-
14
-
15
-
16
-
17
-
18
-
19
-
20
-
21
-
22
-
23
-
24
-
25
-
26
-
27
-
28
-
29
-
30
-
31
-
32
-
33
-
34
-
35
-
36
-
37
-
38
-
39
-
40
-
 41
41 -
 42
42 -
 43
43 -
 44
44 -
 45
45 -
 46
46 -
 47
47 -
 48
48 -
 49
49 -
 50
50 -
 51
51 -
52
-
53
-
54
-
55
-
56
-
57
-
58
-
59
-
60
-
61
-
62
-
63
-
64
-
65
-
66
-
67
-
68
-
69
-
70
-
71
-
72
-
73
-
74
-
75
-
76
-
77
-
78
-
79
-
80
-
81
-
82
-
83
-
84
-
85
-
86
-
87
-
88
-
89
-
90
-
91
-
92
-
93
-
94
-
95
-
96
-
97
-
98
-
99
-
100
-
101
-
102
-
103
-
104
-
105
-
106
-
107
-
108
-
109
-
110
-
111
-
112
-
113
-
114
-
115
-
116
-
117
 |
 |
