Toshiba D-VR600 Owner's Manual - English - Page 26
Setting the A/V Output
 |
UPC - 022265000748
View all Toshiba D-VR600 manuals
Add to My Manuals
Save this manual to your list of manuals |
Page 26 highlights
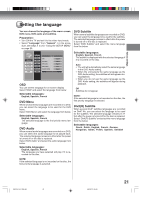
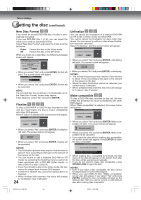
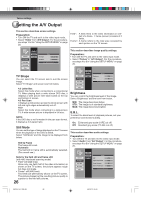
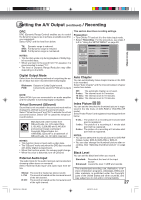
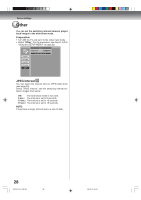
Various settings Setting the A/V Output This section describes screen settings. Preparation: • Turn ON the TV and set it to the video input mode. • Select "Video" from "A/V Output". For the procedure, see steps 1 to 3 in "Using the SETUP MENU" on page 20. Field*: A field refers to the video information in onehalf of a frame. 1 frame (screen) consists of 2 fields. Frame*: A frame refers to the total area occupied by each picture on the TV screen. General A/V Output Timer REC Recording Other Video Picture Audio Video TV Shape Still Mode 4:3 Letter Box Automatic Press RETURN to exit TV Shape You can select the TV screen size to suit the screen image. Select "TV Shape" and screen size from below. 4:3 Letter Box Select this mode when connecting to a conventional TV. When playing back a wide screen DVD disc, it displays a wide picture with black bands at the top and bottom of screen. 4:3 Pan Scan It displays a wide picture across the whole screen with left and right edges automatically cut off. 16:9 Select this mode when connecting to a wide-screen TV. A wide-screen picture is displayed in full size. NOTE: If the DVD disc is not formatted in the pan scan format, it displays a 4:3 aspect ratio. Still Mode You can set the type of image displayed on the TV screen when the playback of the DVD is stilled. Select "Still Mode" and the image to be displayed from below. Still by Frame The frame still is set. Automatic The field still or frame still is automatically selected. (For normal use.) Note for the field still and frame still: (with 480i interlaced scanning mode) • Field* still (240 lines) Since only one field (half of the video information) is shown on the TV screen, the picture appears rough but does not shake. • Frame* still (480 lines) Two fields are alternatively shown on the TV screen. The picture shakes but the resulting picture quality is superior to the field still pictures. 26 This section describes image quality settings. Preparation: • Turn ON the TV and set it to the video input mode. • Select "Picture" in "A/V Output". For the procedure, see steps 1 to 3 in "Using the SETUP MENU" on page 20. General A/V Output Timer REC Recording Other Video Picture Audio Picture Brightness E.B.L. STD Off Press RETURN to exit Brightness You can control the brightness level of the image. Select "Brightness" and the level from below. MIN: The image becomes darker. STD: The image is of standard brightness. MAX: The image becomes brighter. E.B.L. To select the black level of playback pictures, set your preference and monitor's ability. On: Enhanced grey scale (0 IRE cut off) Off: Standard grey scale (7.5 IRE cut off) This section describes audio settings. Preparation: • Turn ON the TV and set it to the video input mode. • Select "Audio" from "A/V Output". For the procedure, see steps 1 to 3 in "Using the SETUP MENU" on page 20. General A/V Output Timer REC Recording Other Video Picture Audio Audio DRC Digital Output Mode Virtual Surround External Audio Input STD PCM Off Stereo Press RETURN to exit 2K70101A_E P20-28 26 08`02`07, 20:43
-
 1
1 -
2
-
3
-
4
-
5
-
6
-
7
-
8
-
9
-
10
-
11
-
12
-
13
-
14
-
15
-
16
-
17
-
18
-
19
-
20
-
 21
21 -
 22
22 -
 23
23 -
 24
24 -
 25
25 -
 26
26 -
 27
27 -
 28
28 -
 29
29 -
 30
30 -
 31
31 -
32
-
33
-
34
-
35
-
36
-
37
-
38
-
39
-
40
-
41
-
42
-
43
-
44
-
45
-
46
-
47
-
48
-
49
-
50
-
51
-
52
-
53
-
54
-
55
-
56
-
57
-
58
-
59
-
60
-
61
-
62
-
63
-
64
-
65
-
66
-
67
-
68
-
69
-
70
-
71
-
72
-
73
-
74
-
75
-
76
-
77
-
78
-
79
-
80
 |
 |