Toshiba D-VR650KU Owner's Manual - English - Page 26
Initial Setting
 |
View all Toshiba D-VR650KU manuals
Add to My Manuals
Save this manual to your list of manuals |
Page 26 highlights
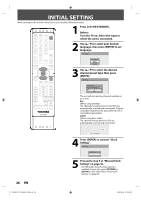
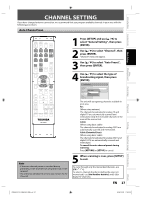
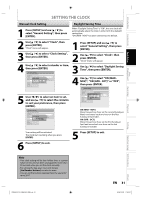
INITIAL SETTING When turning on this unit for the first time, you need to follow these steps. OPEN/ INPUT CLOSE SELECT HDMI .@/: ABC DEF GHI JKL MNO CH PQRS TUV WXYZ SPACE TIMER PROG. 1 Press [I/y ON/STANDBY]. Before: Turn the TV on. Select the input to which the unit is connected. 2 Use [K / L] to select your desired language, then press [ENTER] to set language. Initial Setting DTV/TV SETUP DISPLAY AUDIO DISC MENU TOP MENU OSD Language English Français Español CLEAR ENTER RETURN INSTANT 1.3x/0.8x SKIP PLAY TIME SLIP REV PLAY FWD SKIP STOP SKIP 3 Use [K / L] to select the desired channel preset type then press [ENTER]. Initial Setting Channel Preset Make sure the antenna is connected to "ANTENNA IN" jack. Air Cable PAUSE VCR DVD DUBBING REC MODE REC REPEAT TIMER SET SEARCH ZOOM SE-R0294 The unit will start getting channels available in your area. Air: (When using antenna) The channels broadcasted in TV and DTV are automatically scanned and memorized. Only the receivable channels in the area where this TV is used will be memorized. Cable: (When using basic cable) The channels broadcasted in CATV are automatically scanned and memorized. CH 1 Auto Presetting Now 4 Press [ENTER] to activate "Clock Setting". Initial Setting Clock Setting -- : -- -- 5 Proceed to step 5 in "Manual Clock Setting" on page 31. • If a PBS (public broadcasting station) is available in your area, press [RETURN] or [SETUP] to exit, then follow "Auto Clock Setting" on page 30. 26 EN E9MG0UD_D-VR660KU_EN.indd 26 2008/02/06 20:30:09
-
 1
1 -
2
-
3
-
4
-
5
-
6
-
7
-
8
-
9
-
10
-
11
-
12
-
13
-
14
-
15
-
16
-
17
-
18
-
19
-
20
-
 21
21 -
 22
22 -
 23
23 -
 24
24 -
 25
25 -
 26
26 -
 27
27 -
 28
28 -
 29
29 -
 30
30 -
 31
31 -
32
-
33
-
34
-
35
-
36
-
37
-
38
-
39
-
40
-
41
-
42
-
43
-
44
-
45
-
46
-
47
-
48
-
49
-
50
-
51
-
52
-
53
-
54
-
55
-
56
-
57
-
58
-
59
-
60
-
61
-
62
-
63
-
64
-
65
-
66
-
67
-
68
-
69
-
70
-
71
-
72
-
73
-
74
-
75
-
76
-
77
-
78
-
79
-
80
-
81
-
82
-
83
-
84
-
85
-
86
-
87
-
88
-
89
-
90
-
91
-
92
-
93
-
94
-
95
-
96
-
97
-
98
-
99
-
100
-
101
-
102
-
103
-
104
-
105
-
106
-
107
-
108
-
109
-
110
-
111
-
112
-
113
-
114
-
115
-
116
-
117
-
118
-
119
-
120
-
121
-
122
-
123
 |
 |
