Toshiba D-VR650KU Owner's Manual - English - Page 39
Reformatting a Disc Manually
 |
View all Toshiba D-VR650KU manuals
Add to My Manuals
Save this manual to your list of manuals |
Page 39 highlights
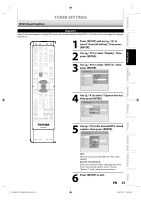
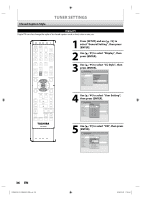
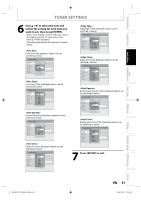
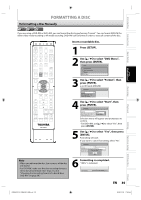
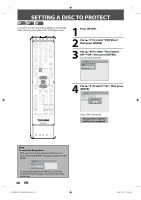
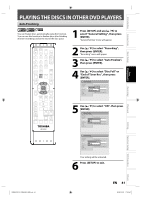
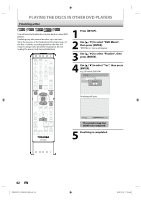
Introduction Connections FORMATTING A DISC Reformatting a Disc Manually Basic Setup Disc Management Recording Playback If you are using a DVD-RW or DVD+RW, you can format the disc by performing "Format". You can format DVD-RW for either video mode recording or VR mode recording. DVD+RW can be format in order to erase all content of the disc. OPEN/ INPUT CLOSE SELECT HDMI .@/: ABC DEF GHI JKL MNO CH PQRS TUV WXYZ SPACE TIMER PROG. DTV/TV SETUP DISPLAY AUDIO DISC MENU TOP MENU CLEAR ENTER RETURN INSTANT 1.3x/0.8x SKIP PLAY TIME SLIP REV PLAY FWD SKIP STOP SKIP PAUSE VCR DVD DUBBING REC MODE REC REPEAT TIMER SET SEARCH ZOOM SE-R0294 Insert a recordable disc. 1 Press [SETUP]. 2 Use [K / L] to select "DVD Menu", then press [ENTER]. Setup General Setting Timer Programming Title List DVD Menu 3 Use [K / L] to select "Format", then press [ENTER]. e.g.) VR mode DVD-RW DVD Menu Format Finalize Disc Protect OFF ON Delete All Playlists 4 Use [K / L] to select "Start", then press [ENTER]. DVD Menu Format Finalize Disc Protect OFF ON Delete All Playlists Start Format Mode Selection menu will appear and prompt you to confirm. • For DVD+RW, use [K / L] to select "Yes", then press [ENTER]. 5 Use [K / L] to select "Yes", then press [ENTER]. Formatting will start. If you want to cancel formatting, select "No". DVD Menu Format Finalize Start Disc Protect OFF ON Format Mode Delete All Playlists Are you sure? Yes No Note • When you reformat the disc, the contents of the disc are erased. • For DVD-RW, make sure that the recording format is set to the desired mode. (See steps 1 to 6 in "Choosing the Recording Format of a Brand-New DVD-RW" on page 38.) 6 Formatting is completed. "100%" is indicated. Formatting 100% EN 39 Editing Function Setup VCR Function Others E9MG0UD_D-VR660KU_EN.indd 39 2008/01/29 17:20:44
-
 1
1 -
2
-
3
-
4
-
5
-
6
-
7
-
8
-
9
-
10
-
11
-
12
-
13
-
14
-
15
-
16
-
17
-
18
-
19
-
20
-
21
-
22
-
23
-
24
-
25
-
26
-
27
-
28
-
29
-
30
-
31
-
32
-
33
-
 34
34 -
 35
35 -
 36
36 -
 37
37 -
 38
38 -
 39
39 -
 40
40 -
 41
41 -
 42
42 -
 43
43 -
 44
44 -
45
-
46
-
47
-
48
-
49
-
50
-
51
-
52
-
53
-
54
-
55
-
56
-
57
-
58
-
59
-
60
-
61
-
62
-
63
-
64
-
65
-
66
-
67
-
68
-
69
-
70
-
71
-
72
-
73
-
74
-
75
-
76
-
77
-
78
-
79
-
80
-
81
-
82
-
83
-
84
-
85
-
86
-
87
-
88
-
89
-
90
-
91
-
92
-
93
-
94
-
95
-
96
-
97
-
98
-
99
-
100
-
101
-
102
-
103
-
104
-
105
-
106
-
107
-
108
-
109
-
110
-
111
-
112
-
113
-
114
-
115
-
116
-
117
-
118
-
119
-
120
-
121
-
122
-
123
 |
 |
