Toshiba GSC-R60 Owners Manual - Page 177
Transferring Videos to a DVD Recorder with DVR, Supported DVD Recorders with DVR
 |
View all Toshiba GSC-R60 manuals
Add to My Manuals
Save this manual to your list of manuals |
Page 177 highlights
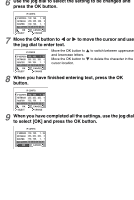
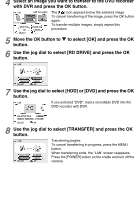
Transferring Videos to a DVD Recorder with DVR Use this procedure to connect the camera set in the cradle to a DVD recorder with DVR and transfer videos. This function allows you to save videos shot using the camera to a DVD recorder with DVR. Supported DVD Recorders with DVR You can only connect DVD recorders equipped with the Toshiba "Net Dubbing" function. Transferring Videos to a DVD Recorder with DVR Connect the AC adapter to the cradle before setting the camera in the cradle ( p.30). Connect the cradle to a DVD recorder with DVR or network device with a LAN cable (sold separately) ( p.153). 1 Turn on power to the DVD recorder with DVR. Once it becomes possible to record or playback, press the cradle's LAN button. The camera starts up in LAN mode, and the LAN LED on the cradle lights. 2 Use the jog dial to select the DVD recorder you want to connect to and then press the OK button. LAN The "LAN" screen appears. RD-XS43 100.100.100.002 OK 3 Use the jog dial to select [SELECT FILE] and press the OK button. LAN The camera images are displayed. SELECT FILE TRANSFER SELECT HDD RD DRIVE CANCEL OK
-
 1
1 -
2
-
3
-
4
-
5
-
6
-
7
-
8
-
9
-
10
-
11
-
12
-
13
-
14
-
15
-
16
-
17
-
18
-
19
-
20
-
21
-
22
-
23
-
24
-
25
-
26
-
27
-
28
-
29
-
30
-
31
-
32
-
33
-
34
-
35
-
36
-
37
-
38
-
39
-
40
-
41
-
42
-
43
-
44
-
45
-
46
-
47
-
48
-
49
-
50
-
51
-
52
-
53
-
54
-
55
-
56
-
57
-
58
-
59
-
60
-
61
-
62
-
63
-
64
-
65
-
66
-
67
-
68
-
69
-
70
-
71
-
72
-
73
-
74
-
75
-
76
-
77
-
78
-
79
-
80
-
81
-
82
-
83
-
84
-
85
-
86
-
87
-
88
-
89
-
90
-
91
-
92
-
93
-
94
-
95
-
96
-
97
-
98
-
99
-
100
-
101
-
102
-
103
-
104
-
105
-
106
-
107
-
108
-
109
-
110
-
111
-
112
-
113
-
114
-
115
-
116
-
117
-
118
-
119
-
120
-
121
-
122
-
123
-
124
-
125
-
126
-
127
-
128
-
129
-
130
-
131
-
132
-
133
-
134
-
135
-
136
-
137
-
138
-
139
-
140
-
141
-
142
-
143
-
144
-
145
-
146
-
147
-
148
-
149
-
150
-
151
-
152
-
153
-
154
-
155
-
156
-
157
-
158
-
159
-
160
-
161
-
162
-
163
-
164
-
165
-
166
-
167
-
168
-
169
-
170
-
171
-
 172
172 -
 173
173 -
 174
174 -
 175
175 -
 176
176 -
 177
177 -
 178
178 -
 179
179 -
 180
180 -
 181
181 -
 182
182 -
183
-
184
-
185
-
186
-
187
-
188
-
189
-
190
-
191
-
192
-
193
-
194
-
195
-
196
-
197
-
198
-
199
-
200
-
201
-
202
-
203
-
204
-
205
-
206
-
207
-
208
-
209
-
210
-
211
-
212
-
213
-
214
-
215
-
216
-
217
-
218
-
219
-
220
-
221
-
222
-
223
-
224
-
225
-
226
-
227
-
228
-
229
-
230
-
231
-
232
-
233
-
234
-
235
-
236
-
237
-
238
-
239
-
240
-
241
-
242
-
243
-
244
-
245
-
246
-
247
-
248
-
249
-
250
-
251
-
252
-
253
-
254
-
255
-
256
-
257
-
258
-
259
-
260
-
261
-
262
-
263
-
264
-
265
-
266
-
267
 |
 |