Toshiba PS610U-NGYSG7 User Manual - Page 74
Connecting a microphone, Using an optional expansion device
 |
View all Toshiba PS610U-NGYSG7 manuals
Add to My Manuals
Save this manual to your list of manuals |
Page 74 highlights
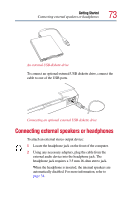
74 Getting Started Connecting a microphone Connecting a microphone To record high-quality sounds, you can attach a microphone: 1 Locate the microphone jack on the front of the computer. 2 Plug the microphone cord into the microphone jack. 3 Turn on the microphone. For more information, see "Recording sounds" on page 148. Using an optional expansion device The optional expansion port allows you to connect your computer to an optional expansion device, which is an excellent investment if you're using your computer both in and out of the office. When you return to your desk, you probably want to connect to your network, print reports from your computer, or use a mouse instead of the AccuPoint II. Connecting cables for each of these devices every time you return to the office is time-consuming and inconvenient. With an expansion device, you can leave external devices connected while you are using your computer away from your desk. When you return, you can quickly connect your computer and have immediate access to all the devices. Toshiba offers a port replicator for the Satellite Pro® 6100 Series. If you connect a 2-button PS/2™ mouse or a 3-button PS/2 mouse to an optional Port Replicator, the mouse cursor may move erratically on your Windows desktop after hot-docking the computer. If this occurs, wait a few seconds until the mouse cursor becomes stable. After the mouse stabilizes, you can use the mouse properly. For more information, see the documentation that comes with the device, or visit toshiba.com.
-
 1
1 -
2
-
3
-
4
-
5
-
6
-
7
-
8
-
9
-
10
-
11
-
12
-
13
-
14
-
15
-
16
-
17
-
18
-
19
-
20
-
21
-
22
-
23
-
24
-
25
-
26
-
27
-
28
-
29
-
30
-
31
-
32
-
33
-
34
-
35
-
36
-
37
-
38
-
39
-
40
-
41
-
42
-
43
-
44
-
45
-
46
-
47
-
48
-
49
-
50
-
51
-
52
-
53
-
54
-
55
-
56
-
57
-
58
-
59
-
60
-
61
-
62
-
63
-
64
-
65
-
66
-
67
-
68
-
 69
69 -
 70
70 -
 71
71 -
 72
72 -
 73
73 -
 74
74 -
 75
75 -
 76
76 -
 77
77 -
 78
78 -
 79
79 -
80
-
81
-
82
-
83
-
84
-
85
-
86
-
87
-
88
-
89
-
90
-
91
-
92
-
93
-
94
-
95
-
96
-
97
-
98
-
99
-
100
-
101
-
102
-
103
-
104
-
105
-
106
-
107
-
108
-
109
-
110
-
111
-
112
-
113
-
114
-
115
-
116
-
117
-
118
-
119
-
120
-
121
-
122
-
123
-
124
-
125
-
126
-
127
-
128
-
129
-
130
-
131
-
132
-
133
-
134
-
135
-
136
-
137
-
138
-
139
-
140
-
141
-
142
-
143
-
144
-
145
-
146
-
147
-
148
-
149
-
150
-
151
-
152
-
153
-
154
-
155
-
156
-
157
-
158
-
159
-
160
-
161
-
162
-
163
-
164
-
165
-
166
-
167
-
168
-
169
-
170
-
171
-
172
-
173
-
174
-
175
-
176
-
177
-
178
-
179
-
180
-
181
-
182
-
183
-
184
-
185
-
186
-
187
-
188
-
189
-
190
-
191
-
192
-
193
-
194
-
195
-
196
-
197
-
198
-
199
-
200
-
201
-
202
-
203
-
204
-
205
-
206
-
207
-
208
-
209
-
210
-
211
-
212
-
213
-
214
-
215
-
216
-
217
-
218
-
219
-
220
-
221
-
222
-
223
-
224
-
225
-
226
-
227
-
228
-
229
-
230
-
231
-
232
-
233
-
234
-
235
-
236
-
237
-
238
-
239
-
240
-
241
-
242
-
243
-
244
-
245
-
246
-
247
-
248
-
249
-
250
-
251
-
252
-
253
-
254
-
255
-
256
-
257
-
258
-
259
-
260
-
261
-
262
-
263
-
264
-
265
-
266
-
267
-
268
-
269
-
270
-
271
-
272
-
273
-
274
-
275
-
276
-
277
-
278
-
279
-
280
-
281
-
282
-
283
-
284
-
285
-
286
-
287
-
288
-
289
-
290
-
291
-
292
-
293
-
294
-
295
 |
 |
