Toshiba RDXS32 Owners Manual - Page 33
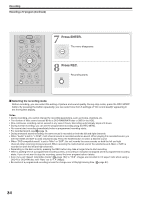
Press QUICK MENU to display the Quick
 |
View all Toshiba RDXS32 manuals
Add to My Manuals
Save this manual to your list of manuals |
Page 33 highlights
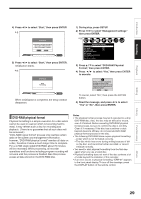
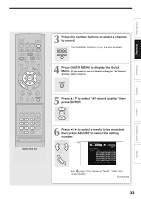
Introduction Recording Playback IP FRAME Editing OPEN/CLOSE DVD TOP MENU MENU RETURN ANGLE SUBTITLE AUDIO CHANNEL HDD TIMESLIP DVD EASY NAVI INSTANT REPLAY INSTANT SKIP REC MENU EDIT MENU LIBRARY CONTENT MENU OW SK SL SEARCH ENTER /ADJUST PAUSE STOP PICTURE PLAY RRECC QUICK MENU VCR Plus+ EXTEND REC MODE TV CODE T.SEARCH 1 2 3 CLEAR 4 5 6 DELETE 7 8 9 SETUP ENTER 0 +10 Open the lid. 3 Press the number buttons to select a channel to record. 1 2 3 4 5 6 7 8 9 0 The CHANNEL buttons ( / ) are also available. 4 Press QUICK MENU to display the Quick Menu. (If you want to use the default setting for "AV Record Quality," skip to step 8.) QUICK MENU 5 Press / to select "AV record quality," then press ENTER. ENTER 6 Press / to select a media to be recorded, then press ADJUST to select the setting number. ENTER /ADJUST e.g. AV record quality HDD Setting 1 Manual 6.6 L-PCM Custom setting Setting Mode DVD - - - SP 4.6 D/M1 Rate Audio quality 1 Manual 6.6 L-PCM 2 SP 4.6 D/M1 3 LP 2.2 D/M1 4 Manual 6.0 D/M2 5 Manual 3.2 D/M1 Total recording time: 71min. (with 4.7 GB unused) SETUP FRAME See page 41 for details on "Mode", "Rate" and "Audio Quality". (Continued) Library Function setup Others 33
-
 1
1 -
2
-
3
-
4
-
5
-
6
-
7
-
8
-
9
-
10
-
11
-
12
-
13
-
14
-
15
-
16
-
17
-
18
-
19
-
20
-
21
-
22
-
23
-
24
-
25
-
26
-
27
-
 28
28 -
 29
29 -
 30
30 -
 31
31 -
 32
32 -
 33
33 -
 34
34 -
 35
35 -
 36
36 -
 37
37 -
 38
38 -
39
-
40
-
41
-
42
-
43
-
44
-
45
-
46
-
47
-
48
-
49
-
50
-
51
-
52
-
53
-
54
-
55
-
56
-
57
-
58
-
59
-
60
-
61
-
62
-
63
-
64
-
65
-
66
-
67
-
68
-
69
-
70
-
71
-
72
-
73
-
74
-
75
-
76
-
77
-
78
-
79
-
80
-
81
-
82
-
83
-
84
-
85
-
86
-
87
-
88
-
89
-
90
-
91
-
92
-
93
-
94
-
95
-
96
-
97
-
98
-
99
-
100
-
101
-
102
-
103
-
104
-
105
-
106
-
107
-
108
-
109
-
110
-
111
-
112
-
113
-
114
-
115
-
116
-
117
-
118
-
119
-
120
-
121
-
122
-
123
-
124
-
125
-
126
-
127
-
128
-
129
-
130
-
131
-
132
-
133
-
134
-
135
-
136
-
137
-
138
-
139
-
140
-
141
-
142
-
143
-
144
-
145
-
146
-
147
-
148
-
149
-
150
-
151
-
152
-
153
-
154
-
155
-
156
-
157
-
158
-
159
-
160
-
161
-
162
-
163
-
164
-
165
-
166
-
167
-
168
-
169
-
170
-
171
-
172
-
173
-
174
-
175
-
176
-
177
-
178
-
179
 |
 |