Toshiba SD-P4000 Owners Manual - Page 16
Connecting to optional equipment
 |
View all Toshiba SD-P4000 manuals
Add to My Manuals
Save this manual to your list of manuals |
Page 16 highlights
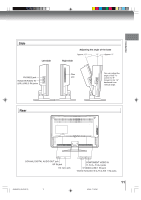
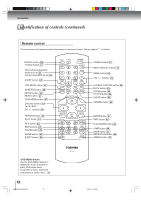
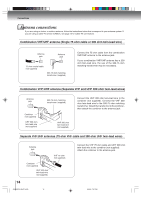
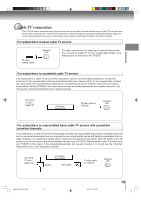
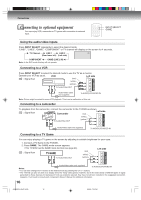
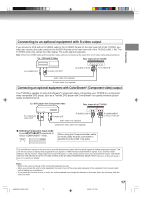
Connections Connecting to optional equipment You can enjoy VCR, camcorder or TV game with connection to external input. INPUT SELECT GAME Using the audio/video inputs Press INPUT SELECT repeatedly to select the desired mode. "LINE1", "LINE2", "GAME", "COMPONENT" or TV channel will display on the screen for 4 seconds. TV Channel LINE 1 LINE 2 LINE 1 (Rear lower left) (Left side) COMPONENT GAME (LINE 2 IN) Note: In the DVD mode this key will not operate. Connecting to a VCR Press INPUT SELECT to select the desired mode to use the TV as a monitor. Operate your VCR as usual. VCR Left side : Signal flow (red) (white) (yellow) To Audio/Video OUT Audio/Video cable (not supplied) To AUDIO(L/R)/VIDEO IN Note: Picture might be muted for some VCR playback. This is not a malfunction of this unit. Connecting to a camcorder To playback from the camcorder, connect the camcorder to the TV/DVD as shown. : Signal flow Camcorder Left side (red) (white) To Audio/Video OUT (yellow) Audio/Video cable (not supplied) To AUDIO(L/R)/VIDEO IN Connecting to a TV Game You can enjoy playing a TV game on the screen by adjusting to suitable brightness for your eyes. 1. Connect a TV Game to the TV/DVD. 2. Press GAME. The GAME mode screen appears. • This TV/DVD has the GAME mode function (see page 24). : Signal flow To Audio/Video OUT (red) (white) (yellow) Left side Audio/Video cable (not supplied) To AUDIO(L/R)/VIDEO IN Notes: • You can also change the TV screen to the desired mode by pressing the CH +/- buttons. • The TV/DVD can also be used as a display device for many video games. However, due to the wide variety of different types of signal generated by these devices and subsequent hook-up variations required, they have not all been included in the suggested connection diagrams. You'll need to consult each component's Owner's Manual for additional information. 16 J5N00201A [E] (P14-25) 16 6/8/04, 7:34 PM
-
 1
1 -
2
-
3
-
4
-
5
-
6
-
7
-
8
-
9
-
10
-
 11
11 -
 12
12 -
 13
13 -
 14
14 -
 15
15 -
 16
16 -
 17
17 -
 18
18 -
 19
19 -
 20
20 -
 21
21 -
22
-
23
-
24
-
25
-
26
-
27
-
28
-
29
-
30
-
31
-
32
-
33
-
34
-
35
-
36
-
37
-
38
-
39
-
40
-
41
-
42
-
43
-
44
-
45
-
46
-
47
-
48
-
49
-
50
-
51
-
52
-
53
-
54
 |
 |
