Toshiba SDV280 Owners Manual - Page 21
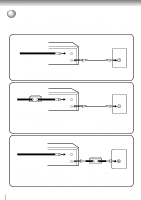
Connecting to an amplifier equipped with an MPEG2 audio decoder
 |
View all Toshiba SDV280 manuals
Add to My Manuals
Save this manual to your list of manuals |
Page 21 highlights
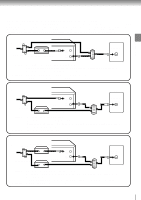
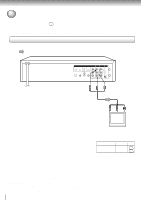
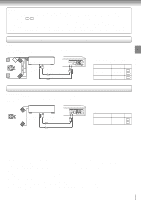
Connections Warning • When you are connecting (via the BITSTREAM/PCM AUDIO OUT jack) an AV decoder that does not have Dolby Digital, Digital Theater Systems (DTS) or MPEG2 decoding function, be sure to set "Audio Out Select" to "PCM" from the on- screen displays 56 58 . Otherwise, high volume sound may damage your hearing as well as the speakers. • When playing DTS-encoded discs (DVD/VCR), excessive noise may be output from the analog stereo jacks. To avoid possible damage to the audio system, you should take proper precautions when the ANALOG AUDIO OUT (L/R) jacks of the DVD/VCR are connected to an amplification system. To enjoy DTS Digital Surround™ playback, an external 5.1 channel DTS Digital Surround™ decoder system must be connected to the BITSTREAM/PCM AUDIO OUT jack of the DVD/VCR. Connecting to an amplifier equipped with an MPEG2 audio decoder MPEG2 sound You can enjoy motion picture and live concert DVD video discs with dynamic realistic sound by connecting an amplifier equipped with an MPEG2 audio decoder or MPEG2 audio processor. Amplifier equipped with an MPEG2 audio decoder To COAXIAL type digital audio input To OPTICAL type digital audio input Optical digital cable DVD OUT DIGITALAUDIO ANALOG AUDIO S OPTICAL COAXIAL L R DVD, VCR OUT COMPONENT Y VIDEO LINE IN1 VIDEO UHF/VHF IN (FROM ANT) PB PR 7230007448 L L(MONO) AUDIO AUDIO OUT (TO TV) R R 34 CH Connect either. 75 Ω coaxial cable • Use DVD video discs encoded via the MPEG2 recording system. • Make the following setting. On-screen display "Audio Out Select" Recording system Select: "Bitstream" MPEG Page 56 58 52 Connecting to an amplifier equipped with a digital audio input 2 channel digital stereo You can enjoy the dynamic sound of 2 channel digital stereo by connecting an amplifier equipped with a digital audio input and speaker system (right and left front speakers). Amplifier equipped with a digital audio input To COAXIAL type digital audio input To OPTICAL type digital audio input Optical digital cable DVD OUT DIGITALAUDIO ANALOG AUDIO S OPTICAL COAXIAL L R DVD, VCR OUT COMPONENT Y VIDEO LINE IN1 VIDEO UHF/VHF IN (FROM ANT) PB PR 7230007448 L L(MONO) AUDIO AUDIO OUT (TO TV) R R 34 CH Connect either. 75 Ω coaxial cable • Make the following setting. On-screen display Select: Page 56 "Audio Out Select" "PCM" 58 Notes: • DO NOT connect the BITSTREAM/PCM AUDIO OUT jack of the DVD/VCR to the AC-3 RF input of a Dolby Digital Receiver. This input on your A/V Receiver is reserved for Laserdisc use only and is incompatible with the BITSTREAM/PCM AUDIO OUT jack of the DVD/VCR. • Connect the BITSTREAM/PCM AUDIO OUT jack of the DVD/VCR to the "OPTICAL" or "COAXIAL" input of a Receiver or Processor. • Refer to the owner's manual of the connected equipment as well. • When you connect the DVD/VCR to other equipment, be sure to turn off the power and unplug all of the equipment from the wall outlet before making any connections. • The output sound of the DVD/VCR has a wide dynamic range. Be sure to adjust the receiver's volume to a moderate listening level. Otherwise, the speakers may be damaged by a sudden high volume sound. • Turn off the amplifier before you connect or disconnect the DVD/VCR's power cord. If you leave the amplifier power on, the speakers may be damaged. 21
-
 1
1 -
2
-
3
-
4
-
5
-
6
-
7
-
8
-
9
-
10
-
11
-
12
-
13
-
14
-
15
-
 16
16 -
 17
17 -
 18
18 -
 19
19 -
 20
20 -
 21
21 -
 22
22 -
 23
23 -
 24
24 -
 25
25 -
 26
26 -
27
-
28
-
29
-
30
-
31
-
32
-
33
-
34
-
35
-
36
-
37
-
38
-
39
-
40
-
41
-
42
-
43
-
44
-
45
-
46
-
47
-
48
-
49
-
50
-
51
-
52
-
53
-
54
-
55
-
56
-
57
-
58
-
59
-
60
-
61
-
62
-
63
-
64
-
65
-
66
-
67
-
68
-
69
-
70
-
71
-
72
-
73
-
74
-
75
-
76
 |
 |
