Toshiba Satellite A210 Maintenance Manual - Page 34
Troubleshooting Procedures, Troubleshooting flowchart 1/2, Is the Power On LED on?
 |
View all Toshiba Satellite A210 manuals
Add to My Manuals
Save this manual to your list of manuals |
Page 34 highlights
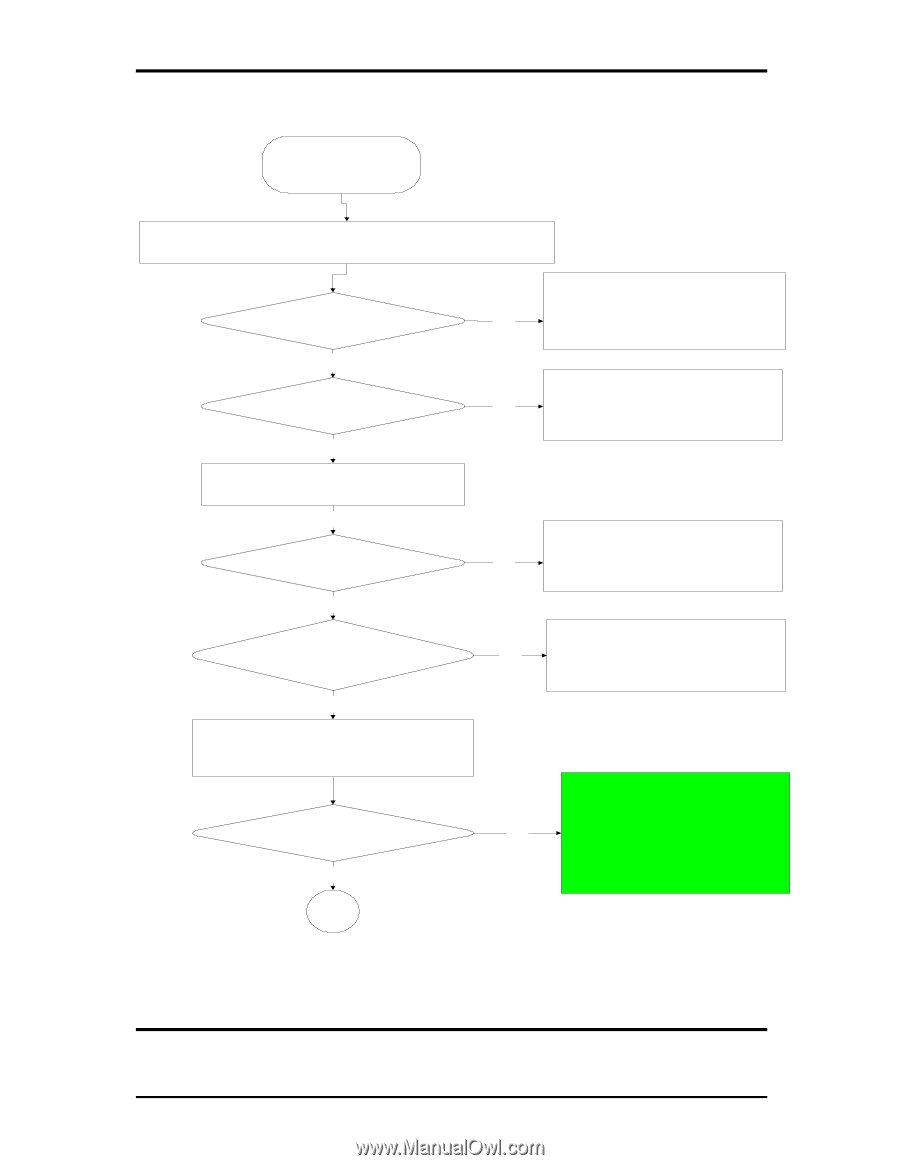
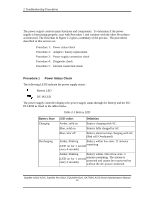
2 Troubleshooting Procedures START Connect the AC adapter to the DC-IN socket Is the DC-IN LED on? Y es Is the Battery LED on? Y es Turn the Power switch on Y es Is the Power On LED on? Y es Is the "Toshiba" logo m essage display? Y es If the "password" m essage displays, type the passw ord, then press Enter. Is Toshiba W indows being loaded? Y es A Perform the Pow er Supply No Troubleshooting procedures in section 2.3 Perform the Pow er Supply No Troubleshooting procedures in section 2.3 Perform the Pow er Supply No Troubleshooting procedures in section 2.3 Perform the Pow er Supply No Troubleshooting procedures in section 2.3 Perform diagnostics No program . Run CM 165.EX E and select the HA RD DISK item . Figure 2-1 Troubleshooting flowchart (1/2) Satellite A210/ A215, Satellite Pro A210, EQUIUM A210, SATEGO A210 Series Maintenance Manual 5
-
 1
1 -
2
-
3
-
4
-
5
-
6
-
7
-
8
-
9
-
10
-
11
-
12
-
13
-
14
-
15
-
16
-
17
-
18
-
19
-
20
-
21
-
22
-
23
-
24
-
25
-
26
-
27
-
28
-
 29
29 -
 30
30 -
 31
31 -
 32
32 -
 33
33 -
 34
34 -
 35
35 -
 36
36 -
 37
37 -
 38
38 -
 39
39 -
40
-
41
-
42
-
43
-
44
-
45
-
46
-
47
-
48
-
49
-
50
-
51
-
52
-
53
-
54
-
55
-
56
-
57
-
58
-
59
-
60
-
61
-
62
-
63
-
64
-
65
-
66
-
67
-
68
-
69
-
70
-
71
-
72
-
73
-
74
-
75
-
76
-
77
-
78
-
79
-
80
-
81
-
82
-
83
-
84
-
85
-
86
-
87
-
88
-
89
-
90
-
91
-
92
-
93
-
94
-
95
-
96
-
97
-
98
-
99
-
100
-
101
-
102
-
103
-
104
-
105
-
106
-
107
-
108
-
109
-
110
-
111
-
112
-
113
-
114
-
115
-
116
-
117
-
118
-
119
-
120
-
121
-
122
-
123
-
124
-
125
-
126
-
127
-
128
-
129
-
130
-
131
-
132
-
133
-
134
-
135
-
136
-
137
-
138
-
139
-
140
-
141
-
142
-
143
-
144
-
145
-
146
-
147
-
148
-
149
-
150
-
151
-
152
-
153
-
154
-
155
-
156
-
157
-
158
-
159
-
160
-
161
-
162
-
163
-
164
-
165
-
166
-
167
-
168
-
169
-
170
-
171
-
172
-
173
-
174
-
175
-
176
-
177
-
178
-
179
-
180
-
181
-
182
-
183
-
184
-
185
-
186
-
187
-
188
-
189
-
190
-
191
-
192
-
193
-
194
-
195
-
196
-
197
-
198
-
199
-
200
-
201
-
202
-
203
-
204
-
205
-
206
-
207
-
208
-
209
-
210
-
211
-
212
-
213
-
214
-
215
-
216
-
217
-
218
-
219
-
220
-
221
-
222
-
223
-
224
-
225
-
226
-
227
-
228
-
229
-
230
-
231
-
232
-
233
-
234
-
235
-
236
-
237
-
238
-
239
-
240
-
241
-
242
-
243
-
244
-
245
-
246
-
247
-
248
-
249
-
250
-
251
-
252
-
253
 |
 |