Toshiba Satellite A350 PSAL6C Users Manual Canada; English - Page 162
Battery Packs, Universal AC Adaptor, Battery Charger, USB floppy diskette drive
 |
View all Toshiba Satellite A350 PSAL6C manuals
Add to My Manuals
Save this manual to your list of manuals |
Page 162 highlights
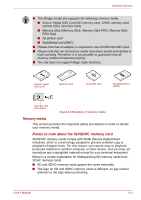
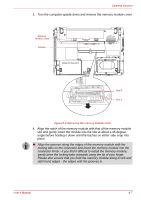
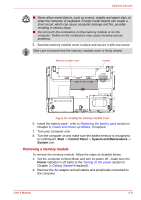
Optional Devices 3. Turn the computer upside down and remove the battery pack (refer to Replacing the battery pack section in Chapter 6, Power and Power-up Modes, if required). 4. Push the latches away from the module in order to release it. 5. Grasp the memory module by its edges and remove it from the computer. ■ If you use the computer for a long time, the memory modules and the circuits locating close to the memory modules will become hot. In this case, let them cool to room temperature before you replace them.Or you will get burnt if you touch any of them. ■ Do not touch the connectors on the memory module or on the computer. Debris on the connectors may cause memory access problems. 6. Seat the memory module cover in place and secure it with one screw. Take care to ensure that the memory module cover is firmly closed. 7. Install the battery pack - refer to Replacing the battery pack section in Chapter 6, Power and Power-up Modes, if required. 8. Turn your computer over. Battery Packs You can increase the portability of the computer with additional battery packs so that, if you're away from an AC power source and your battery runs low, you can replace it with a freshly charged battery. Please refer to Chapter 6, Power and Power-up Modes for further information. Universal AC Adaptor If you frequently use your computer at more than one site, it may be convenient to purchase an additional AC adaptor to be kept at each site in order to remove the need to always carry the adaptor with you. Battery Charger The battery charger provides a convenient way to charge up to two Lithium Ion battery packs without requiring the use of your computer. USB floppy diskette drive The USB floppy diskette drive accommodates either a 1.44MB or 720KB a 3 2/1" floppy diskette and connects to one of the computer's USB ports. The USB floppy diskette drive is available only as an option. User's Manual 8-9
-
 1
1 -
2
-
3
-
4
-
5
-
6
-
7
-
8
-
9
-
10
-
11
-
12
-
13
-
14
-
15
-
16
-
17
-
18
-
19
-
20
-
21
-
22
-
23
-
24
-
25
-
26
-
27
-
28
-
29
-
30
-
31
-
32
-
33
-
34
-
35
-
36
-
37
-
38
-
39
-
40
-
41
-
42
-
43
-
44
-
45
-
46
-
47
-
48
-
49
-
50
-
51
-
52
-
53
-
54
-
55
-
56
-
57
-
58
-
59
-
60
-
61
-
62
-
63
-
64
-
65
-
66
-
67
-
68
-
69
-
70
-
71
-
72
-
73
-
74
-
75
-
76
-
77
-
78
-
79
-
80
-
81
-
82
-
83
-
84
-
85
-
86
-
87
-
88
-
89
-
90
-
91
-
92
-
93
-
94
-
95
-
96
-
97
-
98
-
99
-
100
-
101
-
102
-
103
-
104
-
105
-
106
-
107
-
108
-
109
-
110
-
111
-
112
-
113
-
114
-
115
-
116
-
117
-
118
-
119
-
120
-
121
-
122
-
123
-
124
-
125
-
126
-
127
-
128
-
129
-
130
-
131
-
132
-
133
-
134
-
135
-
136
-
137
-
138
-
139
-
140
-
141
-
142
-
143
-
144
-
145
-
146
-
147
-
148
-
149
-
150
-
151
-
152
-
153
-
154
-
155
-
156
-
 157
157 -
 158
158 -
 159
159 -
 160
160 -
 161
161 -
 162
162 -
 163
163 -
 164
164 -
 165
165 -
 166
166 -
 167
167 -
168
-
169
-
170
-
171
-
172
-
173
-
174
-
175
-
176
-
177
-
178
-
179
-
180
-
181
-
182
-
183
-
184
-
185
-
186
-
187
-
188
-
189
-
190
-
191
-
192
-
193
-
194
-
195
-
196
-
197
-
198
-
199
-
200
-
201
-
202
-
203
-
204
-
205
-
206
-
207
-
208
-
209
-
210
-
211
-
212
-
213
-
214
-
215
-
216
-
217
-
218
-
219
-
220
-
221
-
222
-
223
-
224
-
225
-
226
-
227
-
228
-
229
-
230
-
231
-
232
-
233
-
234
-
235
-
236
-
237
-
238
-
239
 |
 |