Toshiba Satellite A505-S6960 User Guide - Page 55
Adding memory optional, Start, Shut Down
 |
View all Toshiba Satellite A505-S6960 manuals
Add to My Manuals
Save this manual to your list of manuals |
Page 55 highlights
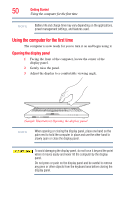
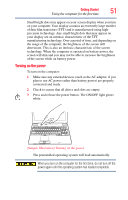
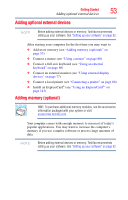
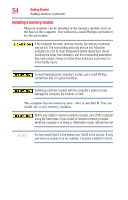
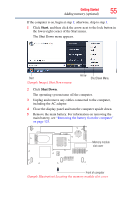
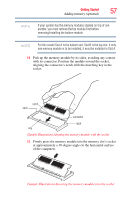
Getting Started Adding memory (optional) 55 If the computer is on, begin at step 1; otherwise, skip to step 3. 1 Click Start, and then click the arrow next to the lock button in the lower-right corner of the Start menu. The Shut Down menu appears. Start (Sample Image) Shut Down menu Arrow Shut Down Menu 2 Click Shut Down. The operating system turns off the computer. 3 Unplug and remove any cables connected to the computer, including the AC adaptor. 4 Close the display panel and turn the computer upside down. 5 Remove the main battery. For information on removing the main battery, see "Removing the battery from the computer" on page 125. Memory module slot cover Front of computer (Sample Illustration) Locating the memory module slot cover
-
 1
1 -
2
-
3
-
4
-
5
-
6
-
7
-
8
-
9
-
10
-
11
-
12
-
13
-
14
-
15
-
16
-
17
-
18
-
19
-
20
-
21
-
22
-
23
-
24
-
25
-
26
-
27
-
28
-
29
-
30
-
31
-
32
-
33
-
34
-
35
-
36
-
37
-
38
-
39
-
40
-
41
-
42
-
43
-
44
-
45
-
46
-
47
-
48
-
49
-
 50
50 -
 51
51 -
 52
52 -
 53
53 -
 54
54 -
 55
55 -
 56
56 -
 57
57 -
 58
58 -
 59
59 -
 60
60 -
61
-
62
-
63
-
64
-
65
-
66
-
67
-
68
-
69
-
70
-
71
-
72
-
73
-
74
-
75
-
76
-
77
-
78
-
79
-
80
-
81
-
82
-
83
-
84
-
85
-
86
-
87
-
88
-
89
-
90
-
91
-
92
-
93
-
94
-
95
-
96
-
97
-
98
-
99
-
100
-
101
-
102
-
103
-
104
-
105
-
106
-
107
-
108
-
109
-
110
-
111
-
112
-
113
-
114
-
115
-
116
-
117
-
118
-
119
-
120
-
121
-
122
-
123
-
124
-
125
-
126
-
127
-
128
-
129
-
130
-
131
-
132
-
133
-
134
-
135
-
136
-
137
-
138
-
139
-
140
-
141
-
142
-
143
-
144
-
145
-
146
-
147
-
148
-
149
-
150
-
151
-
152
-
153
-
154
-
155
-
156
-
157
-
158
-
159
-
160
-
161
-
162
-
163
-
164
-
165
-
166
-
167
-
168
-
169
-
170
-
171
-
172
-
173
-
174
-
175
-
176
-
177
-
178
-
179
-
180
-
181
-
182
-
183
-
184
-
185
-
186
-
187
-
188
-
189
-
190
-
191
-
192
-
193
-
194
-
195
-
196
-
197
-
198
-
199
-
200
-
201
-
202
-
203
-
204
-
205
-
206
-
207
-
208
-
209
-
210
-
211
-
212
-
213
-
214
-
215
-
216
-
217
-
218
-
219
-
220
-
221
-
222
-
223
-
224
-
225
-
226
-
227
-
228
-
229
-
230
-
231
-
232
-
233
-
234
-
235
-
236
-
237
-
238
-
239
-
240
-
241
-
242
-
243
-
244
-
245
-
246
-
247
-
248
-
249
-
250
-
251
-
252
 |
 |

55
Getting Started
Adding memory (optional)
If the computer is on, begin at step
1
; otherwise, skip to step
3
.
1
Click
Start
, and then
click the arrow next to the lock button in
the lower-right corner of the Start menu.
The Shut Down menu appears.
(Sample Image) Shut Down menu
2
Click
Shut Down
.
The operating system turns off the computer.
3
Unplug and remove any cables connected to the computer,
including the AC adaptor.
4
Close the display panel and turn the computer upside down.
5
Remove the main battery. For information on removing the
main battery, see
“Removing the battery from the computer”
on page 125
.
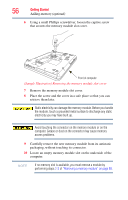
(Sample Illustration) Locating the memory module slot cover
Arrow
Shut Down Menu
Start
Memory module
Front of computer
slot cover