Toshiba Satellite Pro A300 PSAG9C-01J00Y Users Manual Canada; English - Page 89
How to delete the fingerprint data, Start, All Programs, TrueSuite Access, Manager
 |
View all Toshiba Satellite Pro A300 PSAG9C-01J00Y manuals
Add to My Manuals
Save this manual to your list of manuals |
Page 89 highlights
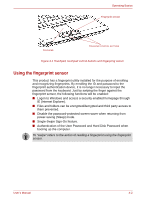
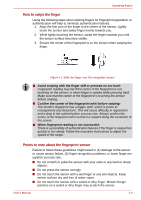
Operating Basics 1. Click Start, point to All Programs, point to TrueSuite Access Manager and click it. Or double click the icon in the Task Bar. 2. The Enter Windows Password screen is displayed. Enter a password into the Enter Windows Password field. Click Next. 3. The Control Center screen is displayed. Click the non-enrolled finger icon above the finger. 4. The Fingerprint Enrollment screen is displayed. Confirm the message and click Next. 5. The Scanning Practice screen is displayed. You can practice swiping your finger. When you have finished practicing swiping your finger, click Next. 6. The Fingerprint Image Capture screen is displayed. Follow the onscreen instructions and use the same finger you have selected under the Control Center to swipe your finger with good images three times for the fingerprint template to be created. 7. In case of finger injury or authentication failure, it is recommended that another fingerprint also be enrolled. The following message will be displayed: [We recommended enrolling at least two fingerprint images.] Click OK and repeat steps 3, 4, 5 and 6 with another finger. How to delete the fingerprint data Saved fingerprint data is stored in the Non-volatile memory inside the fingerprint sensor. If you hand over the PC to others, or dispose of it, the following operations are recommended. 1. Click Start, point to All Programs, point to TrueSuite Access Manager and click it. 2. The TrueSuite Access Manager Fingerprint Software screen is displayed. 3. Enter your Windows Password and click Next to enter the Control Center. Or swipe your enrolled finger to enter the Control Center. 4. The user's fingers screen is displayed. ■ To delete all registered fingerprints: 1. Click Delete All Fingerprint 2. Follow the on-screen instructions to delete the registered fingerprints ■ To delete individual fingerprints: 1. Click the fingerprint mark above the registered finger 2. Are you sure you want to delete this fingerprint? will be displayed on screen, click Yes button. User's Manual 4-6
-
 1
1 -
2
-
3
-
4
-
5
-
6
-
7
-
8
-
9
-
10
-
11
-
12
-
13
-
14
-
15
-
16
-
17
-
18
-
19
-
20
-
21
-
22
-
23
-
24
-
25
-
26
-
27
-
28
-
29
-
30
-
31
-
32
-
33
-
34
-
35
-
36
-
37
-
38
-
39
-
40
-
41
-
42
-
43
-
44
-
45
-
46
-
47
-
48
-
49
-
50
-
51
-
52
-
53
-
54
-
55
-
56
-
57
-
58
-
59
-
60
-
61
-
62
-
63
-
64
-
65
-
66
-
67
-
68
-
69
-
70
-
71
-
72
-
73
-
74
-
75
-
76
-
77
-
78
-
79
-
80
-
81
-
82
-
83
-
 84
84 -
 85
85 -
 86
86 -
 87
87 -
 88
88 -
 89
89 -
 90
90 -
 91
91 -
 92
92 -
 93
93 -
 94
94 -
95
-
96
-
97
-
98
-
99
-
100
-
101
-
102
-
103
-
104
-
105
-
106
-
107
-
108
-
109
-
110
-
111
-
112
-
113
-
114
-
115
-
116
-
117
-
118
-
119
-
120
-
121
-
122
-
123
-
124
-
125
-
126
-
127
-
128
-
129
-
130
-
131
-
132
-
133
-
134
-
135
-
136
-
137
-
138
-
139
-
140
-
141
-
142
-
143
-
144
-
145
-
146
-
147
-
148
-
149
-
150
-
151
-
152
-
153
-
154
-
155
-
156
-
157
-
158
-
159
-
160
-
161
-
162
-
163
-
164
-
165
-
166
-
167
-
168
-
169
-
170
-
171
-
172
-
173
-
174
-
175
-
176
-
177
-
178
-
179
-
180
-
181
-
182
-
183
-
184
-
185
-
186
-
187
-
188
-
189
-
190
-
191
-
192
-
193
-
194
-
195
-
196
-
197
-
198
-
199
-
200
-
201
-
202
-
203
-
204
-
205
-
206
-
207
-
208
-
209
-
210
-
211
-
212
-
213
-
214
-
215
-
216
-
217
-
218
 |
 |