Toshiba TDP-T9 User Manual - Page 24
Turning the power on and off - lamps
 |
View all Toshiba TDP-T9 manuals
Add to My Manuals
Save this manual to your list of manuals |
Page 24 highlights
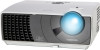
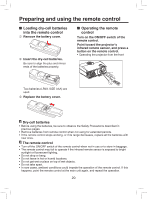
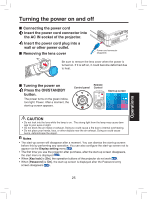
Turning the power on and off ■ Connecting the power cord 1 Insert the power cord connector into the AC IN socket of the projector. 2 Insert the power cord plug into a wall or other power outlet. ■ Removing the lens cover Power cord connector (Supplied) Be sure to remove the lens cover when the power is turned on. If it is left on, it could become deformed due to heat. Operations ■ Turning the power on 1 Press the ON/STANDBY button. The power turns on the green indicators light: Power. After a moment, the start-up screen appears. Control panel POWER Remote Control KEYSTONE + KEYSTONE - Start-up screen CAUTION • Do not look into the lens while the lamp is on. The strong light from the lamp may cause damage to your eyes or sight. • Do not block the air intake or exhaust. Doing so could cause a fire due to internal overheating. • Do not place your hands, face, or other objects near the air exhaust. Doing so could cause burns, deform/break the object. Notes • The start-up screen will disappear after a moment. You can dismiss the start-up screen before this by performing any operation. You can also configure the start-up screen not to appear via the Display setting menu p.34 . • The first time you use the projector after purchase, after the start-up screen disappears, the start menu is displayed p.27 . • When [Key lock] is [On], the operation buttons of the projector do not work p.30 . • When [Password] is [On], the start-up screen is displayed after the Password entry screen disappears p.30 . 25
-
 1
1 -
2
-
3
-
4
-
5
-
6
-
7
-
8
-
9
-
10
-
11
-
12
-
13
-
14
-
15
-
16
-
17
-
18
-
 19
19 -
 20
20 -
 21
21 -
 22
22 -
 23
23 -
 24
24 -
 25
25 -
 26
26 -
 27
27 -
 28
28 -
 29
29 -
30
-
31
-
32
-
33
-
34
-
35
-
36
-
37
-
38
-
39
-
40
-
41
-
42
-
43
-
44
-
45
-
46
 |
 |