Toshiba Tecra A7 PTA71C Users Manual Canada; English - Page 96
How to Enable Fingerprint System Boot Authentication, Settings
 |
View all Toshiba Tecra A7 PTA71C manuals
Add to My Manuals
Save this manual to your list of manuals |
Page 96 highlights
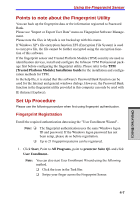
User's Manual Authentication screen is displayed. This will switch the password input screen to the keyboard-based one. Note It is necessary to register the User Password before using theFingerprint Power-on Security and its extended function, the Fingerprint Single Sign-On Feature. Please use TOSHIBA HW Setup to register the User Password. If you fail fingerprint authentication more than five times, you must enter the User Passward or Supervisor Passward manually to satrt the computer. When swiping, please do it slowly and at a constant speed. If this does not improve the authentication rate, please adjust the speed. If there are any changes in the environment or settings related to authorization, you will be required to provide authorization information such as a User Password and HDD password. How to Enable Fingerprint System Boot Authentication Settings It is necessary to first enroll your fingerprint with the Protector Suite QL application prior to enabling and configuring the Fingerprint Power-on Security System. Check that your fingerprint is enrolled before configuring the settings. SeeManual for Fingerprint Registration/Enrollment instructions. 1. Swipe your finger across the Fingerprint Sensor. 2. MENU appears in the lower right corner of the screen. Swipe your finger overtop of the Fingerprint Sensor, and select Control Center from the MENU items. 3. The Fingerprint Software Management screen is displayed to select "settings" → "Power-on Security." 4. Power-on Security screen is displayed. Place a checkmark in Replace the power-on and hard drive passwords with the fingerprint reader and click OK. The modified configuration for Fingerprint Power-on Security becomes effective the next time the system is booted up. OPERATING BASICS 4-10
-
 1
1 -
2
-
3
-
4
-
5
-
6
-
7
-
8
-
9
-
10
-
11
-
12
-
13
-
14
-
15
-
16
-
17
-
18
-
19
-
20
-
21
-
22
-
23
-
24
-
25
-
26
-
27
-
28
-
29
-
30
-
31
-
32
-
33
-
34
-
35
-
36
-
37
-
38
-
39
-
40
-
41
-
42
-
43
-
44
-
45
-
46
-
47
-
48
-
49
-
50
-
51
-
52
-
53
-
54
-
55
-
56
-
57
-
58
-
59
-
60
-
61
-
62
-
63
-
64
-
65
-
66
-
67
-
68
-
69
-
70
-
71
-
72
-
73
-
74
-
75
-
76
-
77
-
78
-
79
-
80
-
81
-
82
-
83
-
84
-
85
-
86
-
87
-
88
-
89
-
90
-
 91
91 -
 92
92 -
 93
93 -
 94
94 -
 95
95 -
 96
96 -
 97
97 -
 98
98 -
 99
99 -
 100
100 -
 101
101 -
102
-
103
-
104
-
105
-
106
-
107
-
108
-
109
-
110
-
111
-
112
-
113
-
114
-
115
-
116
-
117
-
118
-
119
-
120
-
121
-
122
-
123
-
124
-
125
-
126
-
127
-
128
-
129
-
130
-
131
-
132
-
133
-
134
-
135
-
136
-
137
-
138
-
139
-
140
-
141
-
142
-
143
-
144
-
145
-
146
-
147
-
148
-
149
-
150
-
151
-
152
-
153
-
154
-
155
-
156
-
157
-
158
-
159
-
160
-
161
-
162
-
163
-
164
-
165
-
166
-
167
-
168
-
169
-
170
-
171
-
172
-
173
-
174
-
175
-
176
-
177
-
178
-
179
-
180
-
181
-
182
-
183
-
184
-
185
-
186
-
187
-
188
-
189
-
190
-
191
-
192
-
193
-
194
-
195
-
196
-
197
-
198
-
199
-
200
-
201
-
202
-
203
-
204
-
205
-
206
-
207
-
208
-
209
-
210
-
211
-
212
-
213
-
214
-
215
-
216
-
217
-
218
-
219
-
220
-
221
-
222
-
223
-
224
-
225
-
226
-
227
-
228
-
229
-
230
-
231
-
232
-
233
-
234
-
235
-
236
-
237
-
238
-
239
-
240
-
241
-
242
-
243
-
244
-
245
-
246
-
247
-
248
-
249
-
250
-
251
-
252
-
253
-
254
-
255
-
256
-
257
-
258
-
259
-
260
-
261
-
262
-
263
-
264
-
265
-
266
-
267
-
268
-
269
-
270
-
271
-
272
-
273
-
274
-
275
-
276
 |
 |