Toshiba Tecra Z40-A PT449C-019003 Users Manual Canada; English - Page 24
DC IN/Battery, that is resistant to heat damage.
 |
View all Toshiba Tecra Z40-A PT449C-019003 manuals
Add to My Manuals
Save this manual to your list of manuals |
Page 24 highlights
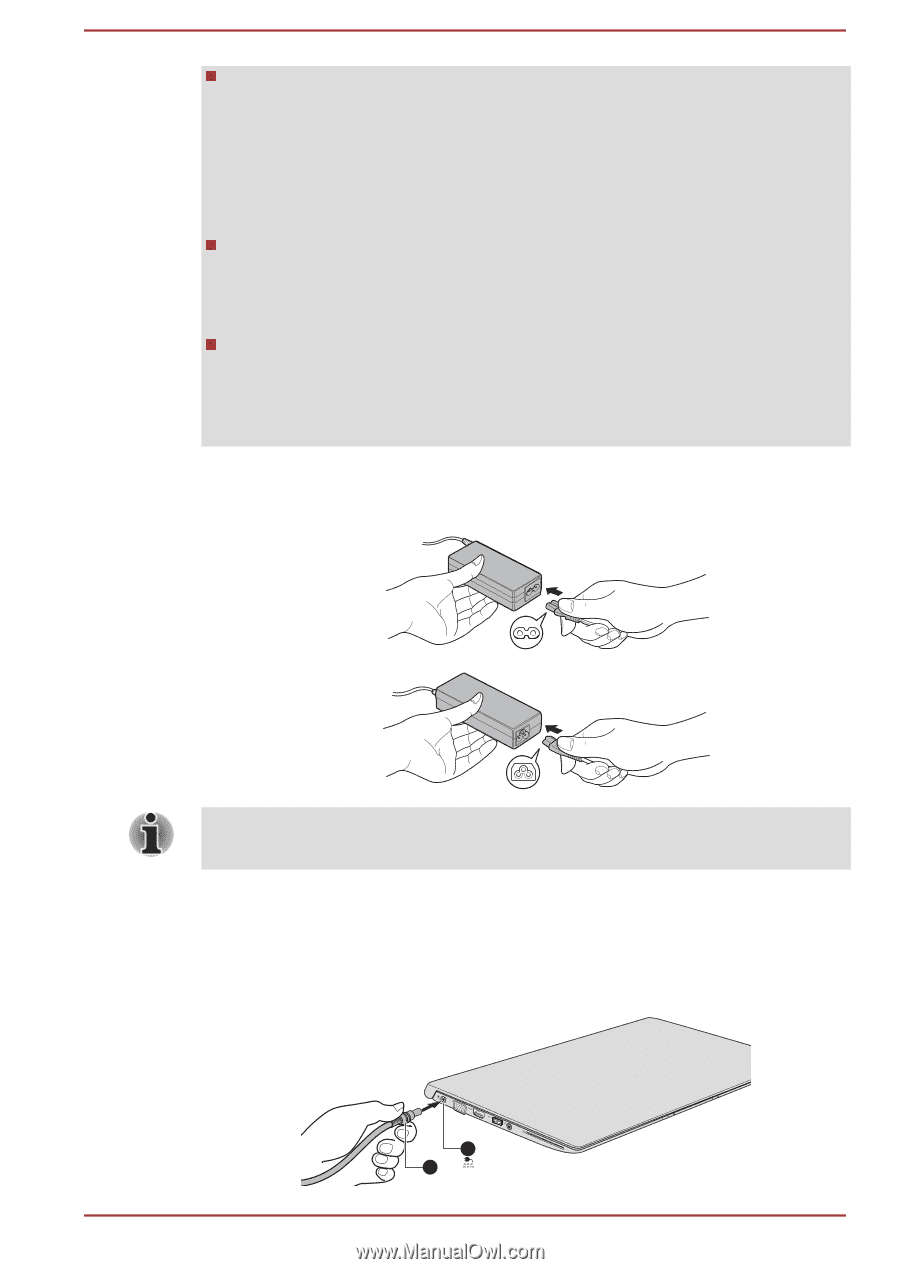
When you connect the AC adaptor to the computer, always follow the steps in the exact order as described in this User's Manual. Connecting the power cable to a live electrical outlet should be the last step otherwise the adaptor DC output plug could hold an electrical charge and cause an electrical shock or minor bodily injury when touched. As a general safety precaution, avoid touching any metal parts. Never place your computer or AC adaptor on a wooden surface, furniture, or any other surface that could be marred by exposure to heat since the computer base and AC adaptor's surface increase in temperature during normal use. Always place your computer or AC adaptor on a flat and hard surface that is resistant to heat damage. Refer to the enclosed Instruction Manual for Safety and Comfort for detailed precautions and handling instructions. 1. Connect the power cord to the AC adaptor. Figure 2-1 Connecting the power cord to the AC adaptor Either a 2-pin or 3-pin adaptor/cord will be included with the computer depending on the model. 2. Connect the AC adaptor's DC output plug to the DC IN 19V jack on your computer. 3. Plug the power cord into a live wall outlet - the DC IN/Battery indicator should glow. Figure 2-3 Connecting the DC output plug to the computer (Z30-A) 1 2 User's Manual 2-4
-
 1
1 -
2
-
3
-
4
-
5
-
6
-
7
-
8
-
9
-
10
-
11
-
12
-
13
-
14
-
15
-
16
-
17
-
18
-
 19
19 -
 20
20 -
 21
21 -
 22
22 -
 23
23 -
 24
24 -
 25
25 -
 26
26 -
 27
27 -
 28
28 -
 29
29 -
30
-
31
-
32
-
33
-
34
-
35
-
36
-
37
-
38
-
39
-
40
-
41
-
42
-
43
-
44
-
45
-
46
-
47
-
48
-
49
-
50
-
51
-
52
-
53
-
54
-
55
-
56
-
57
-
58
-
59
-
60
-
61
-
62
-
63
-
64
-
65
-
66
-
67
-
68
-
69
-
70
-
71
-
72
-
73
-
74
-
75
-
76
-
77
-
78
-
79
-
80
-
81
-
82
-
83
-
84
-
85
-
86
-
87
-
88
-
89
-
90
-
91
-
92
-
93
-
94
-
95
-
96
-
97
-
98
-
99
-
100
-
101
-
102
-
103
-
104
-
105
-
106
-
107
-
108
-
109
-
110
-
111
-
112
-
113
-
114
-
115
-
116
-
117
-
118
-
119
-
120
-
121
-
122
-
123
-
124
-
125
-
126
-
127
-
128
-
129
-
130
-
131
-
132
-
133
-
134
-
135
-
136
-
137
-
138
-
139
-
140
-
141
-
142
-
143
-
144
-
145
-
146
-
147
-
148
-
149
-
150
-
151
-
152
-
153
-
154
-
155
-
156
 |
 |