Toshiba Tecra Z40-A PT449C-019003 Users Manual Canada; English - Page 82
Wireless WAN Device, Installing a SIM Card
 |
View all Toshiba Tecra Z40-A PT449C-019003 manuals
Add to My Manuals
Save this manual to your list of manuals |
Page 82 highlights
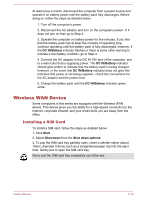
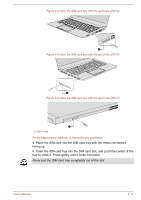
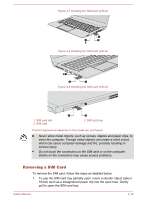
At least once a month, disconnect the computer from a power source and operate it on battery power until the battery pack fully discharges. Before doing so, follow the steps as detailed below. 1. Turn off the computer's power. 2. Disconnect the AC adaptor and turn on the computer's power - if it does not turn on then go to Step 4. 3. Operate the computer on battery power for five minutes. If you find that the battery pack has at least five minutes of operating time, continue operating until the battery pack is fully discharged, however, if the DC IN/Battery indicator flashes or there is some other warning to indicate a low battery condition, go to Step 4. 4. Connect the AC adaptor to the DC IN 19V jack of the computer, and to a wall outlet that is supplying power. The DC IN/Battery indicator should glow amber to indicate that the battery pack is being charged, however, in the event that DC IN/Battery indicator does not glow this indicates that power is not being supplied - check the connections for the AC adaptor and the power cord. 5. Charge the battery pack until the DC IN/Battery indicator glows white. Wireless WAN Device Some computers in this series are equipped with the Wireless WAN device. This device gives you the ability for a high-speed connection to the Internet, corporate intranet, and your email while you are away from the office. Installing a SIM Card To install a SIM card, follow the steps as detailed below: 1. Click Start. 2. Select Shut down from the Shut down options. 3. To pop the SIM card tray partially open, insert a slender object (about 10mm, diameter 0.8mm) such as a straightened paper clip into the eject hole. Gently pull to open the SIM card tray. Never pull the SIM card tray completely out of the slot. User's Manual 4-16
-
 1
1 -
2
-
3
-
4
-
5
-
6
-
7
-
8
-
9
-
10
-
11
-
12
-
13
-
14
-
15
-
16
-
17
-
18
-
19
-
20
-
21
-
22
-
23
-
24
-
25
-
26
-
27
-
28
-
29
-
30
-
31
-
32
-
33
-
34
-
35
-
36
-
37
-
38
-
39
-
40
-
41
-
42
-
43
-
44
-
45
-
46
-
47
-
48
-
49
-
50
-
51
-
52
-
53
-
54
-
55
-
56
-
57
-
58
-
59
-
60
-
61
-
62
-
63
-
64
-
65
-
66
-
67
-
68
-
69
-
70
-
71
-
72
-
73
-
74
-
75
-
76
-
 77
77 -
 78
78 -
 79
79 -
 80
80 -
 81
81 -
 82
82 -
 83
83 -
 84
84 -
 85
85 -
 86
86 -
 87
87 -
88
-
89
-
90
-
91
-
92
-
93
-
94
-
95
-
96
-
97
-
98
-
99
-
100
-
101
-
102
-
103
-
104
-
105
-
106
-
107
-
108
-
109
-
110
-
111
-
112
-
113
-
114
-
115
-
116
-
117
-
118
-
119
-
120
-
121
-
122
-
123
-
124
-
125
-
126
-
127
-
128
-
129
-
130
-
131
-
132
-
133
-
134
-
135
-
136
-
137
-
138
-
139
-
140
-
141
-
142
-
143
-
144
-
145
-
146
-
147
-
148
-
149
-
150
-
151
-
152
-
153
-
154
-
155
-
156
 |
 |