Tripp Lite B022-U08-IP Owner's Manual for B022-U08-IP 1U Rack KVM Switch 93327 - Page 13
Local Console Port Access
 |
View all Tripp Lite B022-U08-IP manuals
Add to My Manuals
Save this manual to your list of manuals |
Page 13 highlights
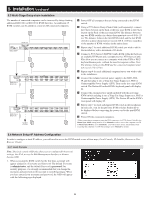
6. KVM Operation (continued) 6.4 Local Console Port Access Once logged into the KVM, you can access connected computers via the local console using the Local Console OSD, Local Console Pushbuttons or Hotkey Commands. The following sections describe all of the ways in which you can access connected computers via the local console. 6.4.1 Local Console OSD Invocation Sequence Once logged into the KVM switch and accessing a connected computer, you will need to use one of two sequences to re-open the OSD Main Menu; [Scroll Lock, Scroll Lock] or [Ctrl, Ctrl]. The default OSD invocation sequence is [Scroll Lock, Scroll Lock]. 6.4.2 Local Console OSD Navigation When in the Local Console OSD, you can use your keyboard and mouse to access its features. • To close out of the Local Console OSD, click the [X] at the upper right corner of the OSD or press the [Esc] key. • To logout, press the [F8] key, click the F8 at the top of the OSD, or click the zZz symbol in the upper right hand corner of the OSD. • To move through the OSD list one line at a time, click the up and down triangle symbols ( , ) or use the [ ] and [ ] keyboard keys. If there are more entries than appear on the screen, the screen will scroll. • To move up or down one screen at a time, click the Up and Down Arrow symbols ( , ), or use the [Pg Up] and [Pg Dn] keyboard keys. If there are more entries than appear on the screen, the screen will scroll. • To activate a port, double-click it, or highlight it and press the [Enter] key. Once a port is accessed, the OSD will close and the screen of the computer connected to the port will be displayed. 6.4.3 Local Console OSD Main Screen Headings SN PN QV NAME The Station Number of each KVM in the installation will be displayed in this column. The Station Number of each KVM switch will be displayed as an expandable folder, which can be expanded to show all of the KVM ports in the corresponding station, or collapsed to hide them. The port numbers of each KVM in the installation are displayed in this column. If the individual stations are collapsed, their port numbers will not be displayed. An arrow in this column indicates that the corresponding port is selected for Quick View scanning. A sun symbol in this column indicates that a computer is both connected to the corresponding port and powered ON. If a port has been given a name, its name appears in this column. 6.4.4 Local Console OSD F1 GOTO Function Click F1 at the top of the OSD or press the [F1] key to activate the GOTO function. GOTO allows you to search the ports on the installation by keying in a Name or Port ID. As you type in a Name or Port ID, the OSD list will automatically display all ports in the installation that match your search terms. To access a port from the list, simply double-click on it or highlight it and press the [Enter] key. To exit GOTO mode and return to the OSD main page, press the [Esc] key. • To search by Name, type [1] into the field that appears when the GOTO function is activated; a Name field will appear. Type in a name to display all accessible ports in the installation that match your entry. • To search by Port ID, type [2] into the field that appears when the GOTO function is activated; a Port ID field will appear. Type in a port ID to display all accessible ports in the installation that match your entry. 6.4.5 Local Console OSD F5 Skip Function Skip Mode allows connected computers to be accessed using the and [ ] keys on the keyboard. To invoke Skip Mode via the local console OSD, click F5 at the top of the OSD or press the [F5] key. When invoked, the KVM displays the screen of the last selected port, with a left/ right triangle symbol next to the port's port ID to signify it is being accessed in Skip Mode. The ports accessed in Skip Mode are determined by the Scan Select setting in the F3 Set page of the local console OSD. During Skip Mode, normal keyboard and mouse functionality is suspended. Keyboard functionality is limited to those keys mentioned in the table below. Mouse functionality is suspended altogether. Key Esc] [Spacebar] Description Skips from the currently selected port to the next accessible port prior to it. Skips from the currently selected port to the next accessible port after it. Skips from the currently selected port to the last accessible port on the previous station. Skips from the currently selected port to the first accessible port on the next station. Exits Skip Mode at the currently selected port. Exits Skip Mode at the currently selected port. 13
-
 1
1 -
2
-
3
-
4
-
5
-
6
-
7
-
 8
8 -
 9
9 -
 10
10 -
 11
11 -
 12
12 -
 13
13 -
 14
14 -
 15
15 -
 16
16 -
 17
17 -
 18
18 -
19
-
20
-
21
-
22
-
23
-
24
-
25
-
26
-
27
-
28
-
29
-
30
-
31
-
32
-
33
-
34
-
35
-
36
-
37
-
38
-
39
-
40
-
41
-
42
-
43
-
44
-
45
-
46
-
47
-
48
-
49
-
50
-
51
-
52
-
53
-
54
-
55
-
56
-
57
-
58
-
59
 |
 |
