Tripp Lite B0930042E4UV Quick Start Guide for B093-004-2E4U-V and B093-008-2E4 - Page 2
Package Includes, Hardware Assembly
 |
View all Tripp Lite B0930042E4UV manuals
Add to My Manuals
Save this manual to your list of manuals |
Page 2 highlights
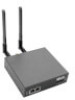
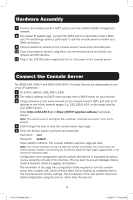
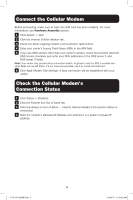
Package Includes • B093-004-2E4U-V or B093-008-2E4U-V Console Server • 4G LTE Blade Antenna (x2) • External Power Supply with NEMA 1-15P (North America), CEE 7/16 Schuko (Europe), BS1363 (UK) and AS2112 (Australia) Plug Adapters (Input: 100-240V, 50/60 Hz, 0.3A; Output: 5V 1A) • Mounting Hardware • Rubber Feet • Dual-SIM Cradle • DB9-to-RJ45 Crossover Serial Adapter • Digital I/O Converter (Terminal Block) • Quick Start Guide Hardware Assembly 1A If free-standing: Attach the adhesive-backed rubber feet to the console server's base. 1A If rack-mounted: Attach the rack kit to the side of the console server to be fixed to the rack. 2 Screw the 4G LTE blade antennas into the main (M) and diversity (A) connectors . Note: Do not screw in 4G LTE antennas any more than finger-tight. The SMA connectors used to connect 4G LTE antennas can be damaged if overtightened. 3 Screw any passive or active GPS antennas into the GPS connector . Note: GPS connectors are available for purchase from Tripp Lite. Visit www.tripplite.com for more information. 4 If you have a data plan, slide the mini-SIM into the SIM cradle with contacts upward. The notch will face inward and be adjacent to the longer cradle arm. If you are only using one SIM, use the bottom slot. 5 Slide the cradle into the console server. Note: B093-004-2E4U-V and B093-008-2E4U-V Console Servers include OCM cellular modem devices, which are programmable to support AT&T USA, Verizon USA, Sprint, Rogers Canada or Telus Canada carriers. 6 Connect the console server's NET1 port to your primary network. 2 17-10-147-93378E.indb 2 11/2/2017 11:52:22 AM
-
 1
1 -
 2
2 -
 3
3 -
 4
4 -
 5
5 -
 6
6 -
 7
7 -
 8
8 -
9
-
10
-
11
-
12
-
13
-
14
-
15
-
16
-
17
-
18
-
19
-
20
-
21
-
22
-
23
-
24
-
25
-
26
-
27
-
28
-
29
-
30
-
31
-
32
 |
 |
