Tripp Lite SU3000RTXLCD2U Owner's Manual for SU3000RTXLCD2U UPS System 9332C3 - Page 16
UPS Setup Overview
 |
View all Tripp Lite SU3000RTXLCD2U manuals
Add to My Manuals
Save this manual to your list of manuals |
Page 16 highlights
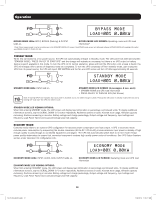
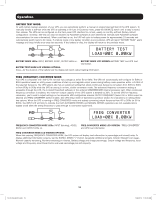
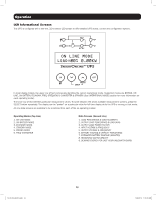
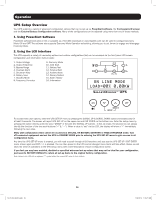
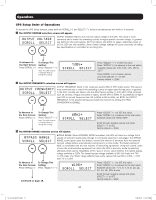
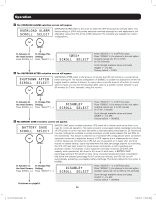
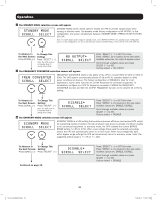
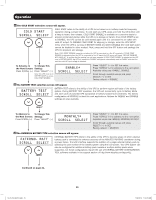
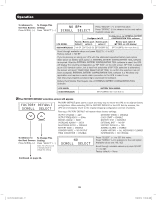
Operation UPS Setup Overview Your UPS supports a variety of advanced configuration options that can be set up via PowerAlert software, the front panel LCD screen and the External Battery Configuration software. Many of the configurations can be adjusted using more than one of these methods. 1. Using PowerAlert Software PowerAlert software (included on CD or available as a free Web download on www.tripplite.com) can be used to configure Economy Mode ON and OFF. The software also supports Economy Mode Operation scheduling, allowing you to set timers to engage and disengage Economy Mode. 2. Using the LCD Interface This UPS supports a variety of user setup options and custom configurations that can be accessed via the front panel LCD screen. Configuration and information items include: 1. Output Voltage 2. Output Frequency 3. Bypass Range 4. Overload Alarm 5. Shutdown After 6. Battery Save 7. Standby Mode 8. Frequency Converter 9. Economy Mode 10. Cold Start 11. Battery Test 12. External Batt 13. Audible Alarm 14. Factory Default 15. Alarm History 16. Information To access these user options, enter the UPS SET-UP menu by pressing the SCROLL UP & SCROLL DOWN buttons simultaneously for at least 3 seconds. The screen will report UPS SET-UP on the upper row and EXIT ENTER on the bottom row. Enter the setup menu by pressing the button directly under the word "ENTER" in the LCD (the SCROLL UP button). In Set-Up mode, the second row will always identify the function of the two scroll buttons ("v" & "^"). When a value is "set" via the LCD, the display will show a "*" immediately following the new value. Many LCD configuration items cannot be accessed in ON LINE, ON BATTERY, ECONOMY or FREQ CONVERTER mode. Turn off connected equipment and set the UPS to STANDBY MODE prior to entering the UPS SET-UP menu to gain access to all configuration items. Any time the UPS SET-UP menu is entered, you will need to scroll through all 16 functions until you see the UPS SET-UP / EXIT ENTER menu screen again and EXIT (^) is pressed. You can then power-on the UPS and all changed menu items will take effect. Below, we will show the order of operations in the UPS Setup menu with a brief description of each configuration screen. If you feel you may have enabled, disabled or specified advanced set-up values that may not be ideal for your configuration, just reset to FACTORY DEFAULT to return all set-up items to the original factory configuration. Note: Values in the LCD with an adjacent "*" symbol reflect the current SET value for that attribute. 16 13-07-015-9332C3.indb 16 7/26/2013 11:16:21 AM
-
 1
1 -
2
-
3
-
4
-
5
-
6
-
7
-
8
-
9
-
10
-
 11
11 -
 12
12 -
 13
13 -
 14
14 -
 15
15 -
 16
16 -
 17
17 -
 18
18 -
 19
19 -
 20
20 -
 21
21 -
22
-
23
-
24
-
25
-
26
-
27
-
28
-
29
-
30
-
31
-
32
-
33
-
34
-
35
-
36
-
37
-
38
-
39
-
40
-
41
-
42
-
43
-
44
-
45
-
46
-
47
-
48
-
49
-
50
-
51
-
52
-
53
-
54
-
55
-
56
-
57
-
58
-
59
-
60
-
61
-
62
-
63
-
64
-
65
-
66
-
67
-
68
-
69
-
70
-
71
-
72
-
73
-
74
-
75
-
76
-
77
-
78
-
79
-
80
 |
 |