Troy-Bilt Bronco CRT Operation Manual - Page 11
Operation - tiller engine
 |
View all Troy-Bilt Bronco CRT manuals
Add to My Manuals
Save this manual to your list of manuals |
Page 11 highlights
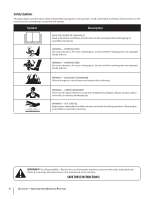
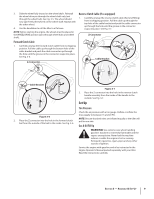
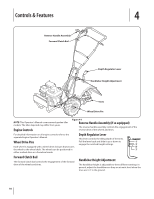
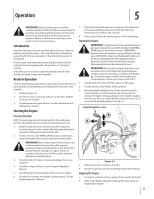
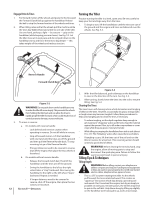
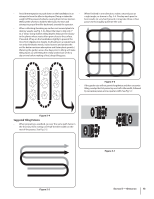
Operation 5 WARNING! Before operating your machine, carefully read and understand this manual and all of its safety, operating and maintenance sections and instructions, along with all of the decals on the machine. Failure to follow these instructions can result in serious personal injury. Introduction Read this Operation Section and the Engine Operator's Manual before you start the engine. Then, take the time to familiarize yourself with the basic operation of the tiller before using it in the garden. Find an open, level area and practice using the tiller controls without the tines engaging the soil (put tines in "transport" setting). Only after you've become completely familiar with the tiller should you begin using it in the garden. Break-In Operation Perform the following maintenance after the first five (5) hours of new operation (see Maintenance & Adjustments Section in this manual). 1. Change engine oil. 2. Check for loose or missing hardware on the tiller. Tighten or replace as needed. 3. Check transmission gear oil level. See the Maintenance & Adjustments section. Starting the Engine Pre-Start Checklist With the spark plug wire disconnected from the spark plug, perform the following checks and services before each use: 1. Read the Safe Operation Practices and the Features & Controls Section in this manual. Read the separate Engine Operator's Manual provided with the tiller. 2. Put the wheels in the WHEEL DRIVE position (wheel pins must be through holes in wheel hubs and wheel shaft). WARNING! Never allow either of the wheels to be in the freewheel position when the engine is running. Always put both wheels in the wheel drive position before starting the engine. Failure to comply could cause loss of tiller control, property damage or personal injury. 3. Check the tiller for loose or missing hardware. Service as required. 4. Check the engine oil level. See the Engine Operator's Manual. 5. Check that all the safety guards and covers are in place. 6. Check the air cleaner and engine cooling system. See the Engine Operator's Manual. 7. Fill the fuel tank with gasoline according to the directions in the separate Engine Operator's Manual. Follow all instructions and safety rules carefully. 8. If necessary, Attach the spark plug wire to the spark plug. Starting the Engine WARNING! To help prevent serious personal injury or damage to equipment, put both wheels in the WHEEL DRIVE position. Never have wheels in FREEWHEEL position when the engine is running. When the wheels are in FREEWHEEL, they do not hold back the tiller and the tines could propel the tiller rapidly forward or backward. Put the Forward Clutch Bail in neutral (disengaged) positions by releasing the lever. WARNING! Never run the engine indoors or in an enclosed, poorly ventilated area. Engine exhaust contains carbon monoxide, an odorless and deadly gas. Avoid the engine muffler and nearby areas. Temperatures in these areas may exceed 150° F. 1. Complete the Pre-Start Checklist above on this page. 2. Put the wheels in the WHEEL DRIVE position. 3. Move the depth regulator lever all the way down to the "travel" position, so that the tines clear the ground. To change the depth setting, pull back on the depth regulator lever (A) and lift up or down (B), then release the lever (C) to secure in the desired position. See Fig, 5-1. Depth Regulator Lever B A Figure 5-1 4. Release all of the controls on the tiller. 5. Start the engine as instructed in the Engine Operator's Manual. Stopping the Engine 1. To stop the wheels and tines, release the Forward Clutch Bail. 2. Refer to the Engine Operator's Manual for instructions on stopping the engine. 11
-
 1
1 -
2
-
3
-
4
-
5
-
 6
6 -
 7
7 -
 8
8 -
 9
9 -
 10
10 -
 11
11 -
 12
12 -
 13
13 -
 14
14 -
 15
15 -
 16
16 -
17
-
18
-
19
-
20
-
21
-
22
-
23
-
24
-
25
-
26
-
27
-
28
-
29
-
30
-
31
-
32
-
33
-
34
-
35
-
36
-
37
-
38
-
39
-
40
-
41
-
42
-
43
-
44
-
45
-
46
-
47
-
48
 |
 |