Troy-Bilt Pony CRT Operation Manual - Page 18
Maintenance & Adjustments
 |
View all Troy-Bilt Pony CRT manuals
Add to My Manuals
Save this manual to your list of manuals |
Page 18 highlights
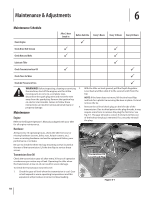
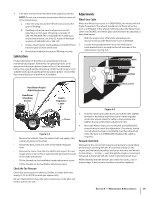
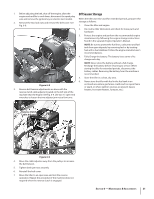
Maintenance & Adjustments 6 Maintenance Schedule Clean Engine After 2-hour break-in Before Each Use P Every 5 Hours Every 10 Hours Every 30 Hours Check Drive Belt Tension P P Check Nuts and Bolts P P Lubricate Tiller P Check Transmission Gear Oil P P Check Tines for Wear P Check Air Pressure in Tires WARNING! Before inspecting, cleaning or servicing 2. the machine, shut off the engine, wait for all the moving parts to come to a complete stop, disconnect the spark plug wire and move the wire away from the spark plug. Remove the ignition key on electric start models. Failure to follow these instructions can result in serious personal injury or property damage. 3. Maintenance Engine Refer to the Engine Operator's Manual packaged with your tiller for all engine maintenance. Hardware At least every 10 operating hours, check the tiller for loose or missing hardware (screws, bolts, nuts, hairpin cotters, etc.). Loose or missing hardware can lead to equipment failure, poor performance or oil leaks. Be sure to check the three end cap mounting screws located at the rear of the transmission. Lift the tine flap to service those screws. Transmission Gear Oil Check the transmission gear oil after every 30 hours of operation or whenever you notice any oil leak. Operating the tiller when the transmission is low on oil can result in severe damage. To Check the Transmission Gear Oil Level: 1. Check the gear oil level when the transmission is cool. Gear oil will expand in warm operating temperatures and this expansion will provide an incorrect oil level reading. P With the tiller on level ground, pull the Depth Regulator Lever back and then slide it to the second notch from the top. NOTE: If the lever does not move, lift the tine hood flap and look for a plastic tie securing the lever in place. Cut and remove the tie. Remove the oil level check plug on the left-side of the transmission. Due to dried paint on the plug threads, it may require some force to remove the plug the first time. See Fig. 6-1. The gear oil level is correct if oil starts to flow out of the hole as the plug is removed. If so, securely reinstall the plug. Transmission Oil Level Check Plug Figure 6-1 18
-
 1
1 -
2
-
3
-
4
-
5
-
6
-
7
-
8
-
9
-
10
-
11
-
12
-
 13
13 -
 14
14 -
 15
15 -
 16
16 -
 17
17 -
 18
18 -
 19
19 -
 20
20 -
 21
21 -
 22
22 -
 23
23 -
24
-
25
-
26
-
27
-
28
 |
 |
