Troy-Bilt Pony CRT Operation Manual - Page 24
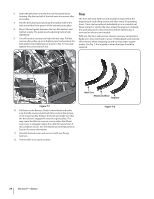
Tines
 |
View all Troy-Bilt Pony CRT manuals
Add to My Manuals
Save this manual to your list of manuals |
Page 24 highlights
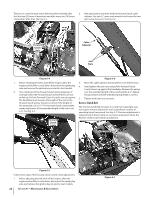
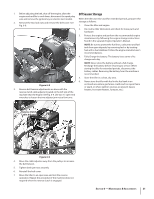
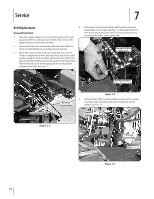
6. Insert the belt down into the front of the transmission housing. Slip the top half of the belt onto the reverse idler Tines arm pulley. The tines will wear with use and should be inspected at the 7. Pull the belt downward and loop the bottom half of the belt around the front groove of the transmission pulley. beginning of each tilling season and after every 30 operating hours. Tines can be replaced individually or as a complete set. Never inspect or service the tines unless the engine is stopped, 8. Mount the belt guide between the two flat washers and the spark plug wire is disconnected, and the ignition key is tighten snugly. The guide needs adjusting before fully removed on electric start models. tightening. With use, the tines will become shorter, narrower and pointed. 9. You will need an assistant to help with this step. Pull the Badly worn tines will result in a loss of tilling depth and reduced reverse idler pulley up to its highest point and position the effectiveness when chopping up and turning under organic belt guide horizontally level as shown in Fig. 7-7. Securely matter. Use Fig. 7-8 as a guide to when the tines should be tighten the screw and lock nut. replaced. Belt Guard Figure 7-7 10. Pull back on the Reverse Clutch Control knob and make sure that the reverse clutch belt fully contacts the groove in the engine pulley. Release the knob and make sure that the belt doesn't engage the reverse engine pulley. This may cause the tiller to move in reverse when the Wheel Gear Lever is engaged. Adjust the cable for less tension if this condition occurs. See the Maintenance & Adjustments Section for more information. 11. Reinstall the belt cover and secure it with two flange locknuts. 12. Test the tiller in an open location. New Tine Moderate Wear Replace Figure 7-8 24 Section 7- Service
-
 1
1 -
2
-
3
-
4
-
5
-
6
-
7
-
8
-
9
-
10
-
11
-
12
-
13
-
14
-
15
-
16
-
17
-
18
-
 19
19 -
 20
20 -
 21
21 -
 22
22 -
 23
23 -
 24
24 -
 25
25 -
 26
26 -
 27
27 -
 28
28
 |
 |
