Troy-Bilt Pony CRT Operation Manual - Page 23
Reverse Idler Pulley
 |
View all Troy-Bilt Pony CRT manuals
Add to My Manuals
Save this manual to your list of manuals |
Page 23 highlights
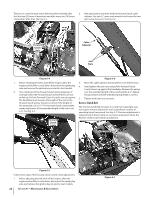
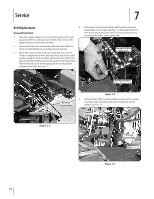
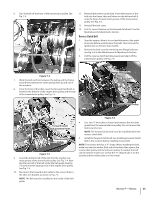
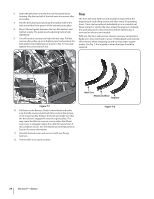
6. Slip the belt off the front of the transmission pulley. See Fig. 7-4. Engine Drive Pulley Transmission Pulley 11. Reinstall the reverse clutch belt. Insert the bottom of the belt into the frame, then pull down on the belt and roll it onto the large, forward-most groove of the transmission pulley. See Fig. 7-5. 12. Reinstall the belt cover. 13. Test for correct tension on the forward clutch belt. See the Maintenance & Adjustments Section. Reverse Clutch Belt 1. Stop the engine, allow it to cool and disconnect the spark plug wire before working near the belts. Also remove the ignition key on electric start models. 2. Remove the belt cover by removing two flange locknuts. See Fig. 6-8 in the Maintenance & Adjustments Section. 3. Pull the reverse clutch belt downward and slip it off the transmission pulley. See Fig. 7-6. Figure 7-4 7. Work the belt out from between the pulley and the frame, around the transmission cover spring, then up and out of the machine. 8. From the front of the tiller, insert the forward clutch belt in between the bottom of the engine drive pulley and the top of the transmission pulley. See Fig. 7-5. Engine Drive Pulley Lock Nut Reverse Idler Pulley Wire Belt Guide Transmission Pulley Forward Clutch Belt Insertion Point Transmission Pulley Figure 7-5 9. Insert the bottom half of the belt into the smaller, rear- most groove of the transmission pulley. See Fig. 7-4. Now slip the top half of the belt under the belt guide (See Fig. 7-3) and onto the large groove of the engine drive pulley. See Fig. 7-4. 10. Reconnect the forward clutch cable to the correct hole in the idler arm bracket, as shown in Fig. 7-2. NOTE: The Belt must be installed on the inside of the belt guide. Figure 7-6 4. Use two 1⁄2" wrenches to loosen and remove the wire belt guide from the reverse idler arm pulley. Do not remove the locknut and screw. NOTE: The forward clutch belt must be installed before the reverse clutch belt. 5. Install the forward clutch belt (see Installing Forward Clutch Belt in this section) before installing reverse belt. NOTE: The reverse belt has a 'V" shape. When installing the belt, make sure that the widest (flat) side of the belt rides against the reverse idler pulley and transmission pulley. If needed, the belt can be twisted "inside out" so that the "V" shaped side is on the outside and the widest side is on the inside. Section 7 - Service 23
-
 1
1 -
2
-
3
-
4
-
5
-
6
-
7
-
8
-
9
-
10
-
11
-
12
-
13
-
14
-
15
-
16
-
17
-
 18
18 -
 19
19 -
 20
20 -
 21
21 -
 22
22 -
 23
23 -
 24
24 -
 25
25 -
 26
26 -
 27
27 -
 28
28
 |
 |
