Troy-Bilt Pony Operation Manual - Page 19
Lubrication, Cleaning the Engine And Deck, Battery - replacement motor
 |
View all Troy-Bilt Pony manuals
Add to My Manuals
Save this manual to your list of manuals |
Page 19 highlights
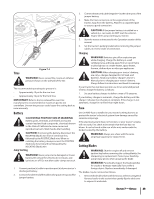
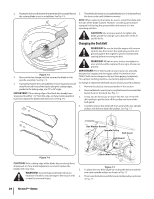
8. Replace the oil filter as instructed in the separate engine Owner's Manual. 9. Refill the engine with new oil. Refer to the engine Owner's Manual for information regarding the proper volume and weight of engine oil. IMPORTANT: Refer to the Engine Owner's Manual packed with your unit for information regarding the quantity and proper viscosity of motor oil. Air Cleaner Service the pre-cleaner (if equipped) and cartridge/air cleaner element as instructed in the Engine Owner's Manual packed with your unit. Spark Plug The spark plug should be cleaned and the gap reset once a season. Spark plug replacement is recommended at the start of each mowing season. Refer to the Engine Owner's Manual for correct plug type and gap specifications. Lubrication WARNING: Before lubricating, repairing, or inspecting, always disengage PTO, move shift lever into neutral position, set parking brake, stop engine and remove key to prevent unintended starting. Engine Lubricate the engine with motor oil as instructed in the Engine Owner Manual packed with your unit. Pivot Points & Linkage Lubricate all the pivot points on the drive system, parking brake and lift linkage at least once a season with light oil. Rear Wheels The rear wheels should be removed from the axles once a season. Lubricate the axles and the rims well with an all-purpose grease before re-installing them. Cleaning the Engine And Deck Any fuel or oil spilled on the machine should be wiped off promptly. Do NOT allow debris to accumulate around the cooling fins of the engine or on any other part of the machine. IMPORTANT: The use of a pressure washer to clean your tractor is NOT recommended. It may cause damage to electrical components, spindles, pulleys, bearings or the engine. Battery The battery is sealed and is maintenance-free. Acid levels cannot be checked. • Always keep the battery cables and terminals clean and free of corrosive build-up. • After cleaning the battery and terminals, apply a light coat of petroleum jelly or grease to both terminals. • Always keep the rubber boot positioned over the positive terminal to prevent shorting. IMPORTANT: If removing the battery for any reason, disconnect the NEGATIVE (Black) wire from it's terminal first, followed by the POSITIVE (Red) wire. When re-installing the battery, always connect the POSITIVE (Red) wire its terminal first, followed by the NEGATIVE (Black) wire. Be certain that the wires are connected to the correct terminals; reversing them could change the polarity and result in damage to your engine's alternating system. Charging IMPORTANT: When charging your tractor's battery, use only a charger designed for 12V lead-acid batteries. Read your battery charger's Owner's Manual prior to charging your tractor's battery. Always follow its instructions and heed its warnings. If your tractor has not been put into use for an extended period of time, charge the battery as follows: • Set your battery charger to deliver a maximum of 10 amperes. If your battery charger is automatic, charge the battery until the charger indicates that charging is complete. NOTE: If the charger is not automatic, charge for no fewer than eight hours. WARNING! Batteries give off an explosive gas while charging. Charge battery in a well ventilated area and keep away from an open flame or pilot light as on a water heater, space heater, furnace, clothes dryer or other gas appliances. Jump Starting WARNING! When removing or installing the battery, follow these instructions to prevent the screwdriver from shorting against the frame. IMPORTANT: Never jump your tractor's dead battery with the battery of a running vehicle. 1. Connect end of one jumper cable to the positive terminal of the good battery, then the other end to the positive terminal of the dead battery. 2. Connect the other jumper cable to the negative terminal of the good battery, then to the frame of the unit with the dead battery. 3. Start the tractor as instructed in the Operation section. WARNING! Failure to use this procedure could cause sparking, and the gas in either battery could explode. Section 6 - Maintenance & Adjustments 19
-
 1
1 -
2
-
3
-
4
-
5
-
6
-
7
-
8
-
9
-
10
-
11
-
12
-
13
-
 14
14 -
 15
15 -
 16
16 -
 17
17 -
 18
18 -
 19
19 -
 20
20 -
 21
21 -
 22
22 -
 23
23 -
 24
24 -
25
-
26
-
27
-
28
-
29
-
30
-
31
-
32
-
33
-
34
-
35
-
36
-
37
-
38
-
39
-
40
-
41
-
42
-
43
-
44
-
45
-
46
-
47
-
48
-
49
-
50
-
51
-
52
-
53
-
54
-
55
-
56
-
57
-
58
-
59
-
60
-
61
-
62
-
63
-
64
 |
 |