Troy-Bilt Pro-Line CRT Operation Manual - Page 13
Suggested Tilling Patterns
 |
View all Troy-Bilt Pro-Line CRT manuals
Add to My Manuals
Save this manual to your list of manuals |
Page 13 highlights
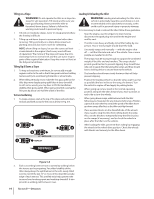
• Avoid the temptation to push down on the handlebars in an • When finished in one direction, make a second pass at attempt to force the tiller to dig deeper. Doing so takes the a right angle, as shown in Fig. 5-6. Overlap each pass for weight off the powered wheels, causing them to lose traction. best results (in very hard ground, it may take three or four Without the wheels to hold the tiller back, the tines will passes to thoroughly pulverize the soil.) attempt to propel the tiller backward, towards the operator. • When cultivating (breaking up surface soil around plants to destroy weeds, see Fig. 5-4), Adjust the tines to dig only 1" to 2" deep. Using shallow tilling depths helps prevent injury to the plants whose roots often grow close to the surface. If needed, lift up on the handlebars slightly to prevent the tines from digging too deeply. (Cultivating on a regular basis not only eliminates weeds, it also loosens and aerates the soil for better moisture absorption and faster plant growth.) Watering the garden area a few days prior to tilling will make tilling easier, as will letting the newly worked soil set for a day or two before making a final, deep tilling pass. Figure 5-6 • If the garden size will not permit lengthwise and then crosswise tilling, overlap the first passes by one-half a tiller width, followed by successive passes at one-quarter width. See Fig. 5-7. Figure 5-4 Suggested Tilling Patterns 1 2 • When preparing a seedbed, go over the same path twice in the first row, then overlap one-half the tiller width on the rest of the passes. See Fig. 5-5. 3 Figure 5-7 Figure 5-5 Section 5 - Operation 13
-
 1
1 -
2
-
3
-
4
-
5
-
6
-
7
-
 8
8 -
 9
9 -
 10
10 -
 11
11 -
 12
12 -
 13
13 -
 14
14 -
 15
15 -
 16
16 -
 17
17 -
 18
18 -
19
-
20
-
21
-
22
-
23
-
24
-
25
-
26
-
27
-
28
-
29
-
30
-
31
-
32
-
33
-
34
-
35
-
36
-
37
-
38
-
39
-
40
-
41
-
42
-
43
-
44
-
45
-
46
-
47
-
48
 |
 |