URC TRF-ZW1 Owners Manual - Page 7
Installation
 |
View all URC TRF-ZW1 manuals
Add to My Manuals
Save this manual to your list of manuals |
Page 7 highlights
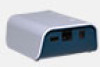
Installation TRF-ZW1 EXTENDER Connect the supplied Ethernet cable to the TRF-ZW1's network port and to an open connection port on your router or network switch. Connect the 12V power adapter to the TRF-ZW1's power port and plug into an electrical outlet. The LED indicators, Power, Ready and Network illuminate when powered. Wait for the LEDs to remain lit; this may take up to 2 minutes. When the lights are solid, the TRF-ZW1 is properly connected to the network. Open a browser and type in https://urc.mios.com. Create an account for access to the TRF-ZW1 Dashboard. The online interface will discover the TRF-ZW1 and open its Dashboard. Refer to the TRF-ZW1 Dashboard and Account Setup section for further details. 5
-
 1
1 -
 2
2 -
 3
3 -
 4
4 -
 5
5 -
 6
6 -
 7
7 -
 8
8 -
 9
9 -
 10
10 -
 11
11 -
 12
12 -
13
-
14
-
15
 |
 |

5
TRF-ZW1 E
XTENDER
Installation
Connect the supplied Ethernet cable to the TRF-ZW1’s
network port and to an open connection port on your router
or network switch.
Connect the 12V power adapter to the TRF-ZW1’s power port
and plug into an electrical outlet.
The LED indicators, Power, Ready and Network illuminate
when powered. Wait for the LEDs to remain lit; this may take
up to 2 minutes
. When the lights are solid, the TRF-ZW1 is
properly connected to the network.
Open a browser and type in
.
C
reate an account for access to the TRF-ZW1 Dashboard. The
online interface will discover the TRF-ZW1 and open its
Dashboard. Refer to the
TRF-ZW1 Dashboard and Account
Setup
section for further details.