Uniden TRU5885-2 English Owners Manual - Page 7
Quick Reference Guide - battery
 |
UPC - 050633260067
View all Uniden TRU5885-2 manuals
Add to My Manuals
Save this manual to your list of manuals |
Page 7 highlights
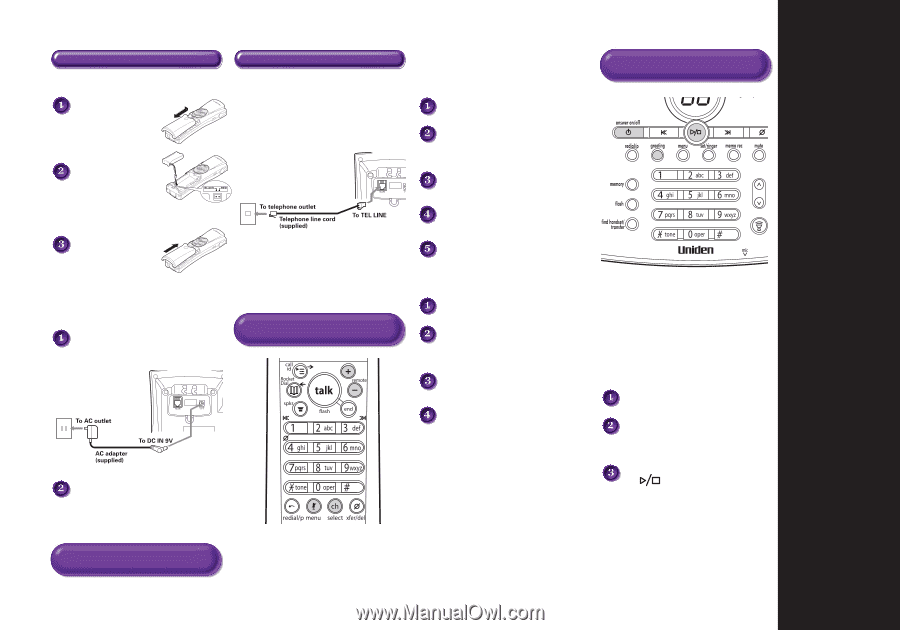
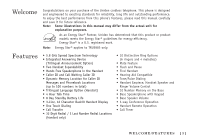
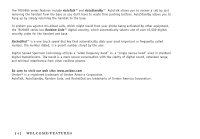
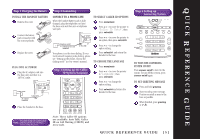
QUICK REFERENCE GUIDE Step 1 Charging the Battery INSTALL THE HANDSET BATTERY Remove the cover. Connect the battery pack connector with the correct polarity. Replace the cover. PLUG INTO AC POWER Plug the AC adapter cord into the base unit and then to a 120V AC outlet. Step 2 Connecting CONNECT TO A PHONE LINE When the handset battery pack is fully charged, plug the telephone cord into the base unit and then into a telephone wall jack. TO SELECT CALLER ID OPTIONS Press menu/mute. Press + or - to move the pointer to "Caller ID Setup", then press select/ch. Press + or - to move the pointer to an option, then press select/ch. Your phone is set for tone dialing. If your local network requires pulse dialing, please see "Setting up the phone, Choose the dialing mode" in your owner's manual. Press + or - to change the option setting. Press select/ch and return the handset to the base. TO CHOOSE THE LANGUAGE Step 3 Setting up the Caller ID Options/Language Press menu/mute. Press + or - to move the pointer to "Language", then press select/ch. Press + or - to change the option setting. Press select/ch and return the handset to the base. Place the handset in the base. Step 4 Setting up Answering System TO TURN THE ANSWERING SYSTEM ON/OFF Press answer on/off to turn On the system. To turn Off the system, press answer on/off again. TO SET GREETING MESSAGE Press and hold greeting. Start recording your message. Position yourself as near to the base as possible. When finished, press greeting or . You must charge the battery pack Note: continuously for 15-20 hours before using the phone. Note: Three Caller ID options are available: Auto Talk, Caller ID on Call Waiting (CIDCW) and Area Code. QUICK REFERENCE GUIDE [ 5 ]
-
 1
1 -
 2
2 -
 3
3 -
 4
4 -
 5
5 -
 6
6 -
 7
7 -
 8
8 -
 9
9 -
 10
10 -
 11
11 -
 12
12 -
13
-
14
-
15
-
16
-
17
-
18
-
19
-
20
-
21
-
22
-
23
-
24
-
25
-
26
-
27
-
28
-
29
-
30
-
31
-
32
-
33
-
34
-
35
-
36
-
37
-
38
-
39
-
40
-
41
-
42
-
43
-
44
-
45
-
46
-
47
-
48
-
49
-
50
-
51
-
52
-
53
-
54
-
55
-
56
-
57
-
58
-
59
-
60
-
61
-
62
-
63
-
64
-
65
-
66
-
67
-
68
-
69
-
70
-
71
-
72
 |
 |