Vaddio AV Bridge AV Bridge Manual - Page 5
Unpacking, Anatomy of the AV Bridge - manual
 |
View all Vaddio AV Bridge manuals
Add to My Manuals
Save this manual to your list of manuals |
Page 5 highlights
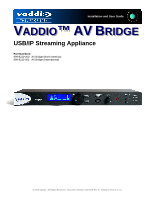
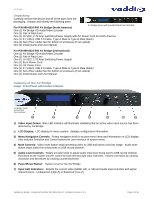
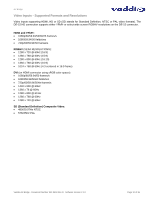
AV Bridge Unpacking: Carefully remove the device and all of the parts from the packaging. Unpack and identify the following parts: For P/N 999-8510-000 AV Bridge (North America) AV Bridge shown with provided Rack Ears Attached One (1) AV Bridge HD Audio/Video Encoder One (1) Pair of Rack Ears One (1) 18 VDC, 2.75 Amp Switching Power Supply with AC Power Cord for North America One (1) 6' (1.83m) USB 2.0 Cable, Type-A Male to Type-B Male (black) One (1) Set of four rubber feet for bottom of enclosure (if not racked) One (1) Install Guide and User Manual For P/N 999-8510-000 AV Bridge (International) One (1) AV Bridge HD Audio/Video Encoder One (1) Pair of Rack Ears One (1) 18 VDC, 2.75 Amp Switching Power Supply One (1) Euro Power Cord One (1) UK Power Cord One (1) 6' (1.83m) USB 2.0 Cable, Type-A Male to Type-B Male (black) One (1) Set of four rubber feet for bottom of enclosure (if not racked) One (1) Install Guide and User Manual Anatomy of the AV Bridge Image: Front Panel with Feature Callouts AV Bridge shown without Rack Ears Attached ➊ ➋ ➌ ➍ ➎ ➏ ➐ 1) Video Input Detect: Blue LED indicator will illuminate validating that an active video input source has been detected by AV Bridge. 2) LCD Display: LCD display for menu system - displays configuration information. 3) Menu Navigation Controls: Rotary navigation knob to access menu items and information on LCD display. Also includes Selection and Cancel buttons for user interface of system menu. 4) Mute Controls: Video mute button stops streaming video to USB and injects color bar image. Audio mute button stops audio from being sent on USB record channel. 5) Audio Level Controls: Rotary encoder knob to adjust audio input level being sent to USB record channel. Functions as the master volume control for both left and right input channels. Volume increases by rotating clockwise and decreases by rotating counterclockwise. 6) Power/Reset Button: System reset for the A/V Bridge. 7) Input LED Indicators: Depicts the current video (HDMI, HD, or SD) and audio input selection and signal characteristics - Unbalanced (High-Z) or Balanced (Low-Z). Vaddio AV Bridge - Document Number 342-0518 Rev D. Software Version 2.1.0 Page 5 of 36
-
 1
1 -
 2
2 -
 3
3 -
 4
4 -
 5
5 -
 6
6 -
 7
7 -
 8
8 -
 9
9 -
 10
10 -
 11
11 -
12
-
13
-
14
-
15
-
16
-
17
-
18
-
19
-
20
-
21
-
22
-
23
-
24
-
25
-
26
-
27
-
28
-
29
-
30
-
31
-
32
-
33
-
34
-
35
-
36
 |
 |