Vaddio AV Bridge AV Bridge Manual - Page 8
Installation Instructions - settings
 |
View all Vaddio AV Bridge manuals
Add to My Manuals
Save this manual to your list of manuals |
Page 8 highlights
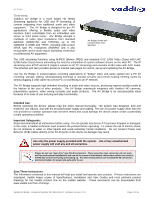
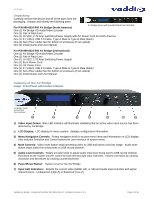
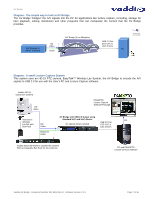
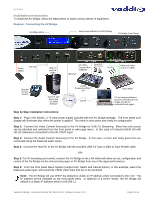
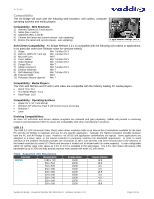
AV Bridge Installation Instructions To install the AV Bridge, follow the steps below to attach various pieces of equipment. Diagram: Connecting the AV Bridge AV Bridge Menu Audio Level Indicator on LCD Display AV Bridge Front Panel Power Supply RS-232 USB 2.0 Audio & Video HD Video Program Bus 1080p/60 Ethernet PowerVIEW™ HD Cameras Cool Mics Balanced Audio Low-Z (+4 dBV) Optional Control System Host PC with Recording & Editing Software Vaddio ProductionVIEW™ HD Cat-5e Audio Mixer PC with approved/tested browser controlling the AV Bridge though the embedded web pages. Step by Step Installation Instructions: Step 1: Plug in the 18VDC, 2.75 Amp power supply included with the AV Bridge package. The front panel LCD display will illuminate blue when the power is applied. The menu is now active and ready for configuration. Step 2: Connect the Video Content Source(s) to the AV Bridge for USB 2.0 Streaming. More than one source can be attached and selected from the front panel or web page menu. In this case a ProductionVIEW HD with HD-22 Cameras is connected to the HD-YPbPr input. Step 3: Connect the Audio Content Source(s) to the AV Bridge. In this case, a mixer and really good mics are connected using the balanced audio inputs. Step 4: Connect the Host PC to the AV Bridge with the provided USB 2.0 Type-A Male to Type-B Male cable. -OR- Step 5: For IP streaming and control, connect the AV Bridge to the LAN which will allow set-up, configuration and control of the AV Bridge via the internal web pages in AV Bridge from any of the approved browsers. Step 6: From the front panel Menu System (Large Knob, Select and Cancel button), in this example, select the balanced audio input, and select HD-YPbPr video input that are to be streamed. Note: The AV Bridge will use DHCP (by default) to obtain an IP address when connected to the LAN. The IP address will be viewable on the front panel menu. In absence of a DHCP server, the AV Bridge will default to a Static IP address which is 169.254.1.1 Vaddio AV Bridge - Document Number 342-0518 Rev D. Software Version 2.1.0 Page 8 of 36
-
 1
1 -
2
-
 3
3 -
 4
4 -
 5
5 -
 6
6 -
 7
7 -
 8
8 -
 9
9 -
 10
10 -
 11
11 -
 12
12 -
 13
13 -
14
-
15
-
16
-
17
-
18
-
19
-
20
-
21
-
22
-
23
-
24
-
25
-
26
-
27
-
28
-
29
-
30
-
31
-
32
-
33
-
34
-
35
-
36
 |
 |
