Vantec UGT-IS602R User Guide - Page 5
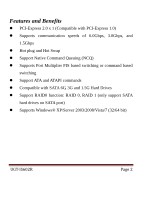
Hardware Installation, Creating and Managing Virtual Disks
 |
View all Vantec UGT-IS602R manuals
Add to My Manuals
Save this manual to your list of manuals |
Page 5 highlights
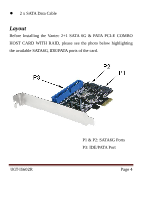
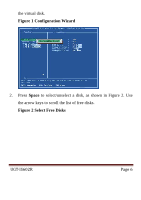
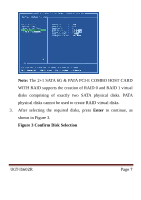
Hardware Installation 1. Turn off the power to your computer. 2. Unplug the power cord and remove your computer's cover. 3. Remove the slot bracket from an available PCIe slot. 4. To install the board, carefully align the card's bus connector with the selected PCIe slot on the motherboard. Push the board down firmly. 5. Attach your internal devices to the 2+1 SATA 6G & PATA PCI-E COMBO HOST CARD WITH RAID. 6. Replace the slot bracket's holding screw to secure the card. 7. Replace the computer cover and reconnect the power cord. Creating and Managing Virtual Disks Creating Virtual Disks This section describes the produce for creating virtual disks using the BIOS Configuration Wizard. To create a virtual disk 1. In the Topology pane, scroll to HBA0: Marvell 0 and press Enter to select. A menu pops-up, as shown in Figure 1. Select Configuration Wizard and press Enter to begin creating UGT‐IS602R Page 5
-
 1
1 -
 2
2 -
 3
3 -
 4
4 -
 5
5 -
 6
6 -
 7
7 -
 8
8 -
 9
9 -
 10
10 -
 11
11 -
12
-
13
-
14
-
15
-
16
-
17
-
18
-
19
-
20
-
21
-
22
-
23
-
24
-
25
-
26
-
27
-
28
-
29
-
30
-
31
-
32
-
33
-
34
-
35
-
36
 |
 |
