ViewSonic M1-2 - 854 x 480 Resolution 300 LED 125 ANSI Lumens 1.2 Throw Ratio - Page 16
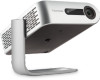
Connec°ng to External Devices
 |
View all ViewSonic M1-2 - 854 x 480 Resolution 300 LED 125 ANSI Lumens 1.2 Throw Ratio manuals
Add to My Manuals
Save this manual to your list of manuals |
Page 16 highlights
Connecting to External Devices SD HDMI USB A HDMI HDMI Connection Connect one end of an HDMI cable to the HDMI port of your video device. Then connect the other end of the cable to the HDMI port (supports HDCP 1.4/HDMI 1.4) of your projector. USB Connection USB Type A Connection To enjoy photos, music, and movies, simply plug in a USB flash drive to the USB Type A port. For supported file formats, see page 48. USB-C Connection Connect one end of a USB Type C cable to the USB-C port of your device. Then connect the other end of the cable to the USB-C port of your projector. NOTE: • Ensure your USB Type C device can support video transmission. • The connected device can also be charged (5V/2A). • To connect the SWITCH via USB-C, please make sure you are also connected with the power adapter. Micro SD To enjoy photos, music, and movies, simply plug in a Micro SD to the Micro SD slot. For supported file formats, see page 48. NOTE: Only supports FAT32 format and up to 256 GB. 16
-
 1
1 -
2
-
3
-
4
-
5
-
6
-
7
-
8
-
9
-
10
-
 11
11 -
 12
12 -
 13
13 -
 14
14 -
 15
15 -
 16
16 -
 17
17 -
 18
18 -
 19
19 -
 20
20 -
 21
21 -
22
-
23
-
24
-
25
-
26
-
27
-
28
-
29
-
30
-
31
-
32
-
33
-
34
-
35
-
36
-
37
-
38
-
39
-
40
-
41
-
42
-
43
-
44
-
45
-
46
-
47
-
48
-
49
-
50
-
51
-
52
-
53
-
54
-
55
-
56
-
57
-
58
-
59
-
60
-
61
-
62
-
63
-
64
-
65
-
66
-
67
-
68
-
69
-
70
-
71
-
72
-
73
-
74
-
75
-
76
-
77
-
78
-
79
-
80
-
81
-
82
-
83
-
84
-
85
-
86
-
87
-
88
-
89
-
90
-
91
-
92
 |
 |
