ViewSonic M1-2 - 854 x 480 Resolution 300 LED 125 ANSI Lumens 1.2 Throw Ratio - Page 25
Using the Projector
 |
View all ViewSonic M1-2 - 854 x 480 Resolution 300 LED 125 ANSI Lumens 1.2 Throw Ratio manuals
Add to My Manuals
Save this manual to your list of manuals |
Page 25 highlights
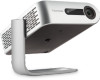
Using the Projector Starting Up the Projector 1. Ensure the projector is connected to a power source or that the battery has sufficient charge. 2. Open the Smart Stand by moving its lens cover down. ENTER ENTER 3. Move the Smart Stand to your desired viewing angle. NOTE: Do not place any heavy objects or press down forcefully on the projector's I/O side when opening the Smart Stand as it may cause damage to the device. 25
-
 1
1 -
2
-
3
-
4
-
5
-
6
-
7
-
8
-
9
-
10
-
11
-
12
-
13
-
14
-
15
-
16
-
17
-
18
-
19
-
 20
20 -
 21
21 -
 22
22 -
 23
23 -
 24
24 -
 25
25 -
 26
26 -
 27
27 -
 28
28 -
 29
29 -
 30
30 -
31
-
32
-
33
-
34
-
35
-
36
-
37
-
38
-
39
-
40
-
41
-
42
-
43
-
44
-
45
-
46
-
47
-
48
-
49
-
50
-
51
-
52
-
53
-
54
-
55
-
56
-
57
-
58
-
59
-
60
-
61
-
62
-
63
-
64
-
65
-
66
-
67
-
68
-
69
-
70
-
71
-
72
-
73
-
74
-
75
-
76
-
77
-
78
-
79
-
80
-
81
-
82
-
83
-
84
-
85
-
86
-
87
-
88
-
89
-
90
-
91
-
92
 |
 |

25
Using the Projector
Star°ng Up the Projector
1.
Ensure the projector is connected to a power source or that the ba²ery has
sufficient charge.
2.
Open the Smart Stand by moving its lens cover down.
3.
Move the Smart Stand to your desired viewing angle.
NOTE:
Do not place any heavy objects or press down
forcefully on the projector’s I/O side when
opening the Smart Stand as it may cause
damage to the device.