ViewSonic PJ1173 PJ1173 User Guide, English - Page 36
IMAGE Menu continued
 |
UPC - 766907299014
View all ViewSonic PJ1173 manuals
Add to My Manuals
Save this manual to your list of manuals |
Page 36 highlights
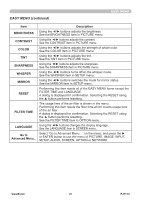
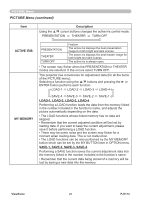
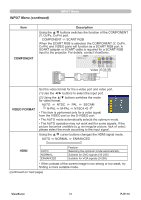
IMAGE Menu IMAGE Menu (continued) Item H PHASE H SIZE AUTO ADJUST EXECUTE Description Using the ▲/▼ buttons adjusts the horizontal phase to eliminate flicker. Right ó Left • This item can be selected only for an RGB signal or a component video signal. (except 525i (480i), 625i (576i), SCART RGB input from the COMPONENT port) Using the ▲/▼ buttons adjusts the horizontal size. Large ó Small • This item can be selected only for an RGB signal. • When this adjustment is excessive, the picture may not be displayed correctly. In such a case, please reset the adjustment by pressing the RESET button on the remote control during this operation. Selecting this item performs the automatic adjustment feature. For an RGB signal The vertical position, the horizontal position and the horizontal phase will be automatically set to default. Make sure that the application window is set to its maximum size prior to attempting to use this feature. A dark picture may still be incorrectly adjusted. Use a bright picture when adjusting. For a video signal and s-video signal The video format best suited for the respective input signal will be selected automatically. This function is available only when the AUTO is selected for the VIDEO FORMAT item in the INPUT menu. The vertical position and horizontal position will be automatically set to the default. For a component video signal The vertical position, horizontal position and horizontal phase will be automatically set to the default. • The automatic adjustment operation requires approx. 10 seconds. Also please note that it may not function correctly with some input. When this function is performed for a video signal, a certain extra such as a line may appear outside a picture. • The items adjusted by this function may vary when the FINE or DISABLE is selected for the AUTO ADJUST item of the SERVICE item in the OPTION menu. ViewSonic 31 PJ1173
-
 1
1 -
2
-
3
-
4
-
5
-
6
-
7
-
8
-
9
-
10
-
11
-
12
-
13
-
14
-
15
-
16
-
17
-
18
-
19
-
20
-
21
-
22
-
23
-
24
-
25
-
26
-
27
-
28
-
29
-
30
-
 31
31 -
 32
32 -
 33
33 -
 34
34 -
 35
35 -
 36
36 -
 37
37 -
 38
38 -
 39
39 -
 40
40 -
 41
41 -
42
-
43
-
44
-
45
-
46
-
47
-
48
-
49
-
50
-
51
-
52
-
53
-
54
-
55
-
56
-
57
-
58
-
59
-
60
-
61
-
62
-
63
-
64
-
65
-
66
-
67
-
68
-
69
-
70
-
71
-
72
-
73
-
74
-
75
-
76
-
77
-
78
-
79
-
80
-
81
-
82
-
83
-
84
-
85
-
86
-
87
-
88
-
89
-
90
-
91
-
92
-
93
-
94
-
95
-
96
-
97
-
98
-
99
-
100
-
101
-
102
-
103
-
104
-
105
-
106
-
107
-
108
-
109
-
110
-
111
-
112
-
113
-
114
-
115
-
116
-
117
-
118
-
119
-
120
-
121
-
122
-
123
-
124
-
125
-
126
-
127
 |
 |
