ViewSonic PJ510 User Guide - Page 11
Connecting Your Devices - lcd
 |
UPC - 766907013412
View all ViewSonic PJ510 manuals
Add to My Manuals
Save this manual to your list of manuals |
Page 11 highlights
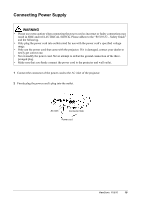
Connecting Your Devices WARNING Incorrect connecting could result in fire or electrical shock. Whenever attempting to connect other devices to the projector, please thoroughly read the "PJ510 QUICK START GUIDE", this manual and the manual of each device to be connected. CAUTION TURN OFF ALL DEVICES prior to connecting them to the projector. Attempting to connect a live device to the projector may generate extremely loud noises or other abnormalities that may result in malfunction and/or damage to the device and/or projector. ATTENTION • Make sure that you connect devices to the correct port. Incorrect connection may result in malfunction and/or damage to the device and/or projector. Refer to the section "Technical" of this manual for the pin assignment of connectors and RS-232C communication data. • Some cables have to be used with core set. Use the accessory cable or a designated-type cable for the connection. For cables that have a core only at one end, connect the core to the projector. • Secure the screws on the connectors and tighten. • Whenever attempting to connect a laptop computer to the projector, be sure to activate the laptop's RGB external image output (set the laptop to CRT display or to simultaneous LCD and CRT display). For details on how this is done, please refer to the instruction manual of the corresponding laptop computer. NOTE: About Plug-and-Play Capability • This projector is compatible with VESA DDC 1/2B. Plug-and-Play can be achieved by connecting this projector to computers that are VESA DDC (display data channel) compatible. Please take advantage of this function by connecting the accessory RGB cable to the RGB port (DDC 1/2B compatible). Plug-and-Play may not work properly if any other type of connection is attempted. • Plug-and-Play is a system composed of the computer, its operating system and peripheral equipment (i.e. display devices). • Please use the standard drivers in your computer, as this projector is a Plug-and-Play monitor. NOTE: • Some computers may have multiple display screen modes. Use of some of these modes will not be possible with this projector. • For some RGB input modes, the optional Mac adapter is necessary. ViewSonic PJ510 8
-
 1
1 -
2
-
3
-
4
-
5
-
 6
6 -
 7
7 -
 8
8 -
 9
9 -
 10
10 -
 11
11 -
 12
12 -
 13
13 -
 14
14 -
 15
15 -
 16
16 -
17
-
18
-
19
-
20
-
21
-
22
-
23
-
24
-
25
-
26
-
27
-
28
-
29
-
30
-
31
-
32
-
33
-
34
-
35
-
36
-
37
-
38
-
39
-
40
-
41
-
42
-
43
-
44
-
45
-
46
-
47
-
48
-
49
 |
 |