ViewSonic PX727-4K PX727-4K User Guide English - Page 20
Connecting a computer or monitor, Connecting a computer, Connecting Video source devices
 |
View all ViewSonic PX727-4K manuals
Add to My Manuals
Save this manual to your list of manuals |
Page 20 highlights
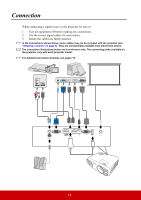
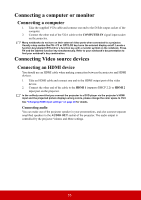
Connecting a computer or monitor Connecting a computer 1. Take the supplied VGA cable and connect one end to the D-Sub output socket of the computer. 2. Connect the other end of the VGA cable to the COMPUTER IN signal input socket on the projector. Many notebooks do not turn on their external video ports when connected to a projector. Usually a key combo like FN + F3 or CRT/LCD key turns the external display on/off. Locate a function key labeled CRT/LCD or a function key with a monitor symbol on the notebook. Press FN and the labeled function key simultaneously. Refer to your notebook's documentation to find your notebook's key combination. Connecting Video source devices Connecting an HDMI device You should use an HDMI cable when making connection between the projector and HDMI devices. 1. Take an HDMI cable and connect one end to the HDMI output port of the video device. 2. Connect the other end of the cable to the HDMI 1 (supports DHCP 2.2) or HDMI 2 input port on the projector. In the unlikely event that you connect the projector to a DVD player via the projector's HDMI input and the projected picture displays wrong colors, please change the color space to YUV. See "Changing HDMI input settings" on page 20 for details. Connecting audio You can make use of the projector speaker in your presentations, and also connect separate amplified speakers to the AUDIO OUT socket of the projector. The audio output is controlled by the projector Volume and Mute settings. 15
-
 1
1 -
2
-
3
-
4
-
5
-
6
-
7
-
8
-
9
-
10
-
11
-
12
-
13
-
14
-
 15
15 -
 16
16 -
 17
17 -
 18
18 -
 19
19 -
 20
20 -
 21
21 -
 22
22 -
 23
23 -
 24
24 -
 25
25 -
26
-
27
-
28
-
29
-
30
-
31
-
32
-
33
-
34
-
35
-
36
-
37
-
38
-
39
-
40
-
41
-
42
-
43
-
44
-
45
-
46
-
47
-
48
-
49
-
50
-
51
-
52
-
53
-
54
-
55
-
56
-
57
-
58
-
59
-
60
-
61
-
62
 |
 |
