ViewSonic Pro9800WUL PRO9510L User Guide English - Page 17
Rear view
 |
View all ViewSonic Pro9800WUL manuals
Add to My Manuals
Save this manual to your list of manuals |
Page 17 highlights
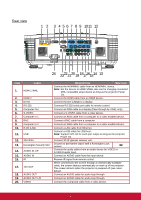
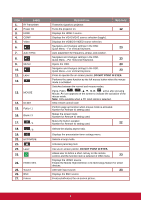
Rear view 1 2 3 4 5 6 7 8 9 1011 12 HDM I 1 / MHL HDM I 2 DV I-D Computer Out Computer In 1 Computer In 2 LAN USB 3D VESA RS -232 R G B H V Wi red In R em ote Out S-Video Audio Video In L Audio R DV I-D In 1 In 2 In Audi o Service MIC Out L R Audi o Out 12V Out IR 24 2322212019 1817161514 13 ITEM LABEL 1. HDMI 1 /MHL 2. HDMI 2 3. DVI-D 4. RS-232 5. Computer Out 6. S-VIDEO 7. Computer In 1 8. BNC 9. Computer In 2 10. RJ45 (LAN) 11. USB 12. 3D-VESA 13. Kensington Security Slot 14. AUDIO IN L/R 15. AUDIO IN 16. IR 17. 12V OUT 18. AUDIO OUT 19. AUDIO OUT L/R 20. VIDEO DESCRIPTION SEE PAGE Connect the HDMI/MHL cable from an HDMI/MHL device. Note: Set the Source to HDMI 1/MHL also can be charging connected MHL compatible smart device as long as the projector Power On. Connect the HDMI cable from an HDMI device. Connect the DVI CABLE to a display. Connects RS-232 serial port cable for remote control. Connect an RGB cable to a display (Pass through by VGA1 only). Connect a S-VIDEO cable from a video device. Connect an RGB cable from a computer or a video enabled device. Connect a BNC cable from a computer. Connect an RGB cable from a computer or a video enabled device. Connect a LAN cable from Ethernet. Connect a USB cable for USB host. Note: Support 5V/1.0A for each port output as long as the projector Power On. Connect 3D IR glasses receiver unit. Secures to permanent object with a Kensington Lock system. 62 Connect the audio cables from an audio device for VIDEO or S-VIDEO audio input. Connect an AUDIO cable from the input device. Receive IR signal from remote control. When connected to the screen through a commercially available cable, the screen deploys automatically on start up of the projector. The screen retracts when the projector is powered off (see notes below). Connect an AUDIO cable for audio loop through. Connect an AUDIO cable for audio loop through. Connect the composite cable from a video device. 4
-
 1
1 -
2
-
3
-
4
-
5
-
6
-
7
-
8
-
9
-
10
-
11
-
 12
12 -
 13
13 -
 14
14 -
 15
15 -
 16
16 -
 17
17 -
 18
18 -
 19
19 -
 20
20 -
 21
21 -
 22
22 -
23
-
24
-
25
-
26
-
27
-
28
-
29
-
30
-
31
-
32
-
33
-
34
-
35
-
36
-
37
-
38
-
39
-
40
-
41
-
42
-
43
-
44
-
45
-
46
-
47
-
48
-
49
-
50
-
51
-
52
-
53
-
54
-
55
-
56
-
57
-
58
-
59
-
60
-
61
-
62
-
63
-
64
-
65
-
66
-
67
-
68
-
69
-
70
-
71
-
72
-
73
-
74
-
75
-
76
-
77
-
78
-
79
-
80
-
81
-
82
-
83
-
84
-
85
-
86
-
87
-
88
-
89
-
90
-
91
-
92
-
93
-
94
-
95
-
96
-
97
-
98
-
99
-
100
 |
 |
