Viking 30inch 500 VGBQ Use and Care Manual - Page 12
Rotisserie
 |
View all Viking 30inch 500 VGBQ manuals
Add to My Manuals
Save this manual to your list of manuals |
Page 12 highlights
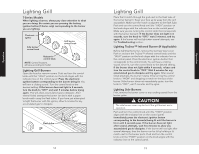
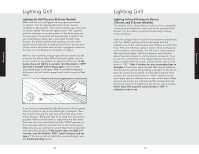
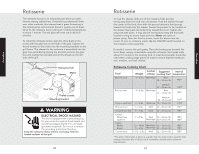
Operation Rotisserie The rotisserie burner is an infrared burner which provides intense searing radiant heat. Preferred by professional chefs over other methods, this intense heat is great for searing in the natural juices and nutrients found in quality cuts of meat. Once lit, the rotisserie burner will reach cooking temperatures in about 1 minute. The red glow will even out in about 5 minutes. To install the rotisserie motor, align the drive shaft on the motor with the gear box on the side of the grill. Tighten the thumb screws on the motor into the mounting brackets on the grill frame. The skewer for the rotisserie is assembled into the gear box assembly by placing the pointed end into the gear box and resting the rounded end on the wheels on the left side of the grill. Rotisserie fork Motor Skewer Gear box Thumb screws Mounting bracket WARNING ELECTRICAL SHOCK HAZARD This unit is equipped with a grounding plug for your protection against shock hazard and should be plugged directly into a properly grounded receptacle. Do not cut or remove the grounding prong from this plug. Keep the rotisserie motor electric cord away from the heated surfaces of the grill. 22 Rotisserie To load the skewer, slide one of the rotisserie forks (prongs facing away from the end) onto the skewer. Push the skewer through the center of the food, then slide the second rotisserie fork (prongs toward the food) onto the skewer. Center the product to be cooked on the skewer then push the forks firmly toward the food. Tighten the wing nuts with pliers. It may also be necessary to wrap the food with butcher's string to secure loose portions. Never use nylon or plastic string. Once the food is secure, insert the skewer into the motor. To turn on rotisserie motor, flip the ON/OFF switch located on the rotisserie motor assembly. If needed, remove the grill grates. Place the basting pan beneath the food. Keep canopy closed while using the rotisserie. Each peek adds about 15 minutes to the cooking time. A meat thermometer should be used when cooking large pieces of meat to ensure that the meats are rare, medium, and well cooked. Rotisserie Cooking Chart Food Control Suggested Internal Weight setting cooking time* temperature Beef rib roast 4 - 6 lbs. Med-High Rare 14 - 16 min./lb. 145˚F Bnls tip roast 4 - 6 lbs. Medium 23 - 25 min./lb. Med-High Rare 14 - 16 min./lb. 160˚F 145˚F Bone-in pork butt 3 - 5 lbs Medium 23 - 25 min./lb. Med-Low 15 - 18 min./lb. Bnls pork loin 3 - 5 lbs Med 22 - 25 min./lb. Smoked ham half 5 - 7 lbs Med 22 - 25 min./lb. Chicken Whole fryer Quarters Turkey Whole Breast Cornish hens 2 - 4 lbs Med 25 - 30 min./lb. Med-High 20 - 22 min./lb. 12 - 14 lbs Med-High 16 - 18 min./lb. 5 - 6 lbs Med-High 22 - 25 min./lb. 1-1/2 - 2 lbs. Med 22 - 25 min./lb. 160˚F 170˚F 170˚F 170˚F 180˚F 180˚F 180˚F 170˚F 180˚F *The above information is given as a guide only. You may need to vary the heat settings and times due to factors such as weather, climate and/or personal requirements. 23 Operation
-
 1
1 -
2
-
3
-
4
-
5
-
6
-
 7
7 -
 8
8 -
 9
9 -
 10
10 -
 11
11 -
 12
12 -
 13
13 -
 14
14 -
 15
15 -
 16
16 -
 17
17 -
18
 |
 |
