Viking 30inch 500 VGBQ Use and Care Manual - Page 6
Before Lighting Grill, Features - t series
 |
View all Viking 30inch 500 VGBQ manuals
Add to My Manuals
Save this manual to your list of manuals |
Page 6 highlights
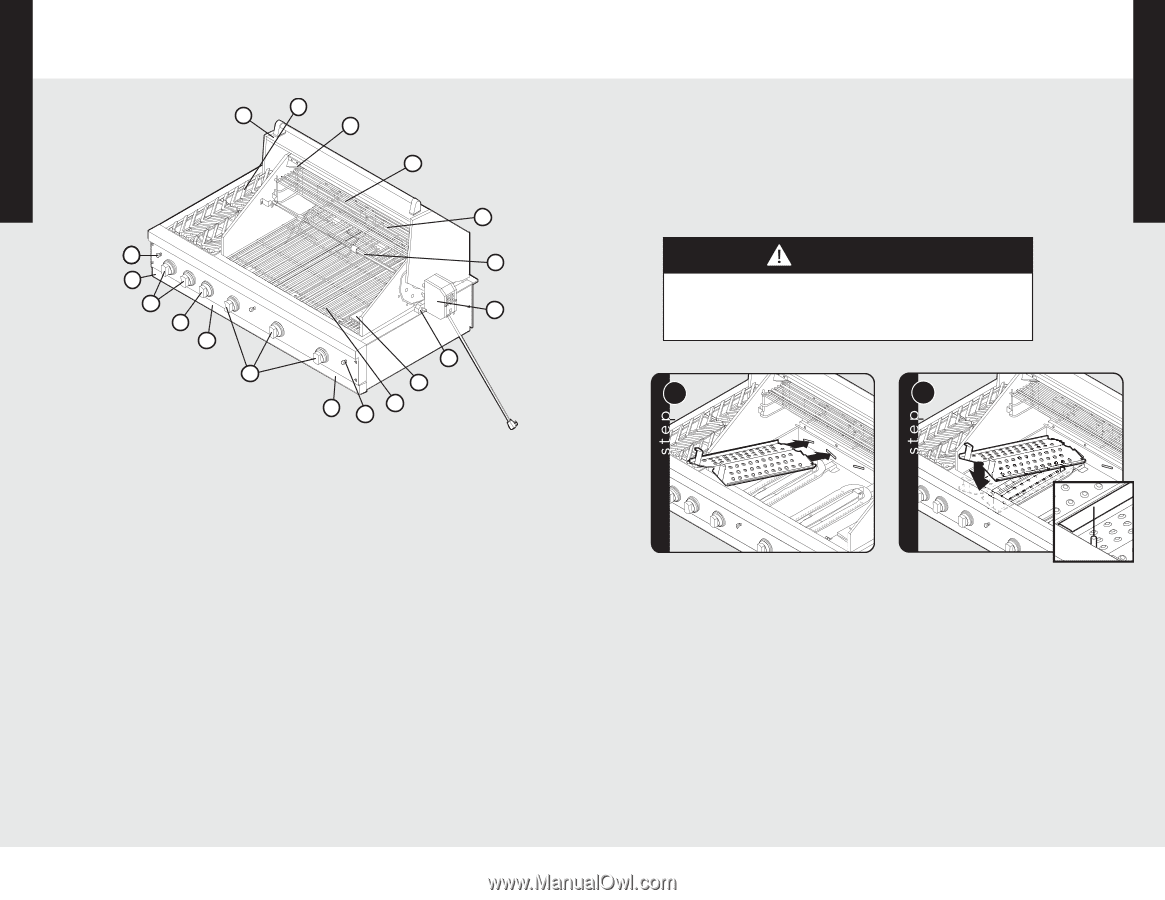
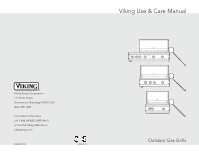
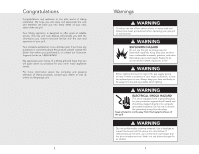
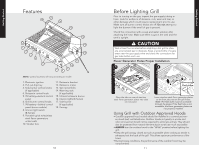
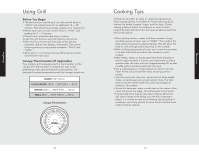
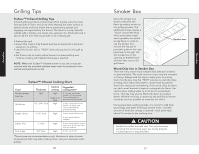
Getting Started Features 17 18 16 15 14 1 2 3 4 5 6 13 12 11 10 7 9 8 NOTE: Control locations will vary according to model. 1. Electronic ignition 2. Pull out drip tray 3. Side burner control knobs (if applicable) 4. Rotisserie control knob 5. 9V battery-behind control panel 6. Grill burner control knobs 7. 9V battery-behind control panel (some models) 8. Interior light switch (E-Series) 9. Porcelain grids w/stainless steel flavor generators underneath 10. Smoker box 11. Rotisserie bracket 12. Rotisserie motor 13. Spit rod w/forks 14. Warming rack (if applicable) 15. Infrared rotisserie burner 16. Interior lights (E-Series) 17. Side burner (if applicable) 18. Canopy 10 Before Lighting Grill Prior to turning on the gas, inspect the gas supply tubing or hose. Look for evidence of abrasion, cuts, wear and tear, or other damage which could require replacement prior to use. Make sure all burner control knobs are off. Do not attempt to light the burners if the smell of gas is present. Check the connection with a soap and water solution after attaching the hose. Make sure there is gas in the tank and the tank is upright. CAUTION Wait at least five minutes before relighting a hot grill to allow any accumulated gas to dissipate. Keep a spray bottle of soapy water near the gas supply valve and check the connections for gas leaks before each use. Flavor Generator Plates Proper Installation 1 2 Flash tube Flash tube Place the tabs on rear of stainless steel flavor generator plates into slots on rear panel. Lower stainless steel flavor generator plates so the front tabs rest on the grill frame. Note: The flash tube must be accessible through the plates. If the flash tube is not accessible, the flavor generator plates are not properly installed. Using Grill with Outdoor Approved Hoods • Outdoor approved hood models should be installed in a covered yet nonenclosed (well ventilated) area. Outdoor hoods aid greatly in smoke and odor removal, but should not be expected to eliminate entirely. They should also be protected from natural elements (such as rain) as much as possible. • ALWAYS turn the outdoor hood to the "HIGH" position before lighting the grill. • Keep the grill canopy closed as much as possible when cooking so smoke is exhausted out the back of the grill. This allows optimum performance of the hood. • During breezy conditions, the performance of the outdoor hood may be compromised. 11 Getting Started
-
 1
1 -
 2
2 -
 3
3 -
 4
4 -
 5
5 -
 6
6 -
 7
7 -
 8
8 -
 9
9 -
 10
10 -
 11
11 -
 12
12 -
13
-
14
-
15
-
16
-
17
-
18
 |
 |