Viking FDWU524WS Use and Care Manual - Page 8
AC BC CC
 |
View all Viking FDWU524WS manuals
Add to My Manuals
Save this manual to your list of manuals |
Page 8 highlights
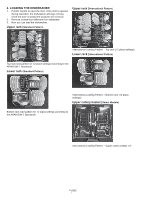
4.1 UPPER RACK Load the upper rack with dessert plates, cups, glasses etc. ADJUSTING THE HEIGHT OF THE UPPER BASKET (Select Models) The upper basket height adjustment mechanism has been designed for you to create large spaces in the lower or upper sections of your machine depending on your needs by adjusting the height in the upper or lower direction while your basket is empty or loaded. ADJUSTABLE SHELVES (Select Models) Depending on the size of the glasses and cups, the shelf height setting may be adjusted. 1. Fold the shelf upwards A. 2. Positioning at the desired height B. 3. Fold the shelf again downwards C. Thanks to this mechanism, you can use your basket in three different positions lower, middle and upper positions (1, 2, 3). 1. To raise your basket, hold the upper basket wires with both hands while the basket is in the lowermost position and pull them up (A). 2. You will hear a "Click" from the right and left mechanisms, indicating that the basket has reached the next level. Release the basket. Repeat the process if the height is not sufficient. 1 2 3 COLLAPSIBLE UPPER BASKET WIRES (Select Models) You can use collapsible wires when you need a larger space for your dishes in the upper basket of your machine. To bring the collapsible wires into horizontal position, grab the wire from the middle position and push them in the direction of arrow in the figure. Place your larger dishes into the area created. To bring the wires back to vertical position, just lift them up. To lower the basket, while it is in the uppermost position; 1. Hold the upper basket wires with both hands, slightly lift up the basket and simultaneously push and release the latches shown in the figure (B). 2. Lower the basket from its current position to the lower one. 3. Release the basket after it has reached one level down. Repeat the process if the height is not sufficient. C Bringing the wires to the horizontal position by holding them from the tips may cause them to bend. Therefore, hold the wires from their stems while bringing them to the horizontal or vertical positions. C The movement mechanism may not function properly if the upper basket is overloaded or if the weight distribution is not balanced. In heavier conditions, there is the risk of falling one level down. C Make sure that the adjustment mechanism has the same positions on the right and left sides of the upper basket. 8 USA
-
 1
1 -
2
-
 3
3 -
 4
4 -
 5
5 -
 6
6 -
 7
7 -
 8
8 -
 9
9 -
 10
10 -
 11
11 -
 12
12 -
 13
13 -
14
-
15
-
16
-
17
-
18
-
19
-
20
-
21
-
22
-
23
-
24
-
25
-
26
-
27
-
28
-
29
-
30
-
31
-
32
 |
 |
